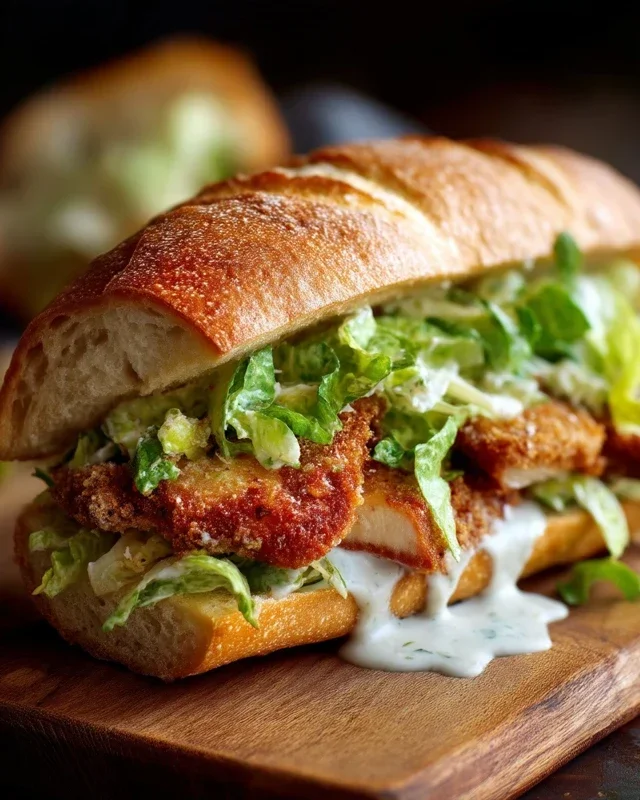
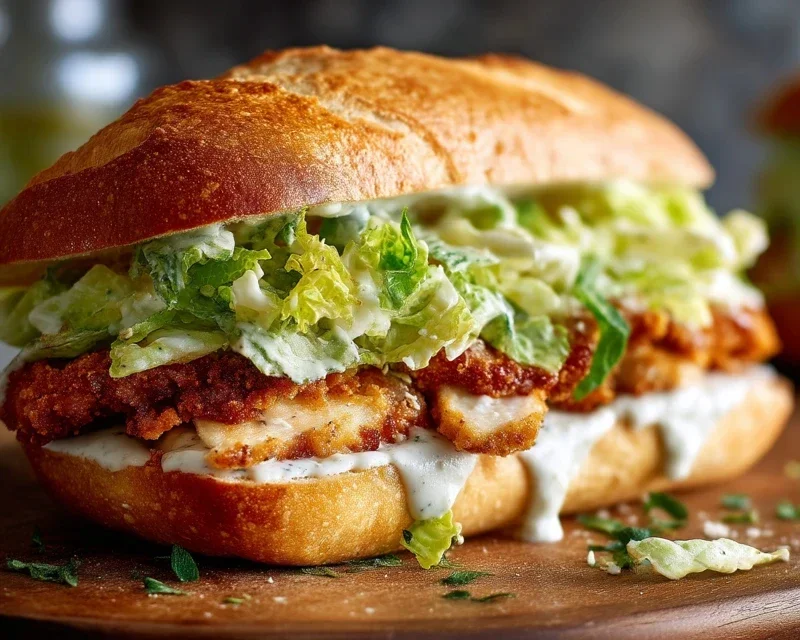
Crispy Chicken Caesar Sandwich-Best Ever Recipe
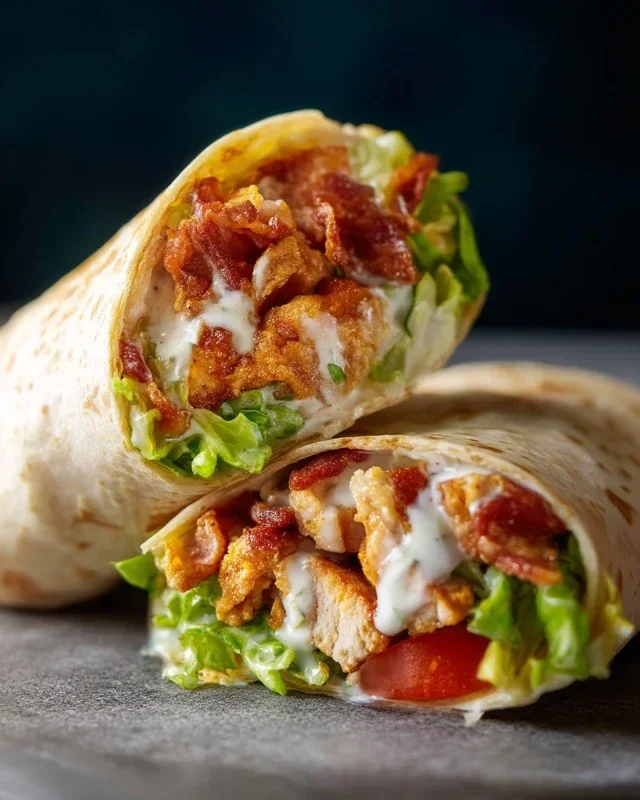
Crispy Chicken Caesar Sandwiches are the ultimate upgrade to your lunch game, transforming a classic salad into a handheld masterpiece that’s impossible to resist. We all love the tangy, garlicky goodness of a Caesar salad, but imagin extracte that same vibrant flavor profile encased in a warm, soft bun, complemented by the satisfying crunch of perfectly fried chicken. That’s the magic of this Crispy Chicken Caesar Sandwich! It’s more than just a sandwich; it’s an experience. The salty parmesan, the bright lemon dressing, the peppery arugula – it all comes together in a symphony of textures and tastes that’s incredibly satisfying. What makes this version truly special is the dedication to achieving that ideal crispy chicken texture, ensuring every bite delivers that delightful crunch before giving way to tender, juicy meat, all swimming in that irresistible Caesar dressing. Get ready to fall in love with lunch all over again.
Crispy Chicken Caesar Sandwich
There’s something undeniably satisfying about a classic Caesar salad. The creamy, tangy dressing, the crisp romaine, the salty Parmesan. Now, imagin extracte all of that elevated into a handheld delight – a Crispy Chicken Caesar Sandwich. We’re taking the beloved flavors of Caesar salad and transforming them into a truly craveable sandwich experience. The star of the show is, of course, the chicken. We’ll be breading and frying it to golden-brown perfection, ensuring a delightful crunch with every bite. Then, we’ll slather it with a homemade Caesar dressing that’s leagues beyond any bottled version, piled high with crisp romaine and a sprinkle of extra Parmesan. This isn’t just lunch; it’s a culinary masterpiece in sandwich form. Let’s get started!
Ingredients:
Preparing the Crispy Chicken
The foundation of this incredible sandwich is perfectly crispy, juicy chicken. We’ll start by preparing our chicken cutlets. If your chicken cutlets are particularly thick, you can gently pound them to an even thickness using a meat mallet or the bottom of a heavy pan. This ensures they cook evenly and quickly. Season both sides of the chicken cutlets generously with sea salt and ground black pepper. This initial seasoning is crucial for building flavor from the inside out.
Next, we’ll set up our breading station. You’ll need three shallow dishes or plates. In the first dish, place the ⅓ cup of all-purpose flour seasoned with ½ tsp salt. In the second dish, whisk one or two eggs (you’ll need about 2 eggs for 5 cutlets, though the recipe doesn’t explicitly list them, they are a crucial binder for breading, so we will assume they are available) until lightly beaten. In the third dish, combine the ⅓ cup of all-purpose flour with a generous pinch of salt and pepper. This is where the magic happens for that irresistible crunch.
Now, for the breading process. Take each seasoned chicken cutlet and dredge it lightly in the seasoned flour, shaking off any excess. This first layer of flour helps the egg adhere better. Next, dip the floured cutlet into the whisked egg, ensuring it’s fully coated. Let any excess egg drip off. Finally, press the egg-coated cutlet firmly into the seasoned flour mixture, making sure it’s completely covered on all sides. Gently shake off any excess flour. For an even crispier crust, you can double-dip by dipping the floured and egg-coated cutlet back into the egg and then again into the seasoned flour. Place the breaded cutlets on a wire rack set over a baking sheet and let them rest for about 10-15 minutes. This resting period allows the coating to adhere to the chicken, preventing it from falling off during frying.
Frying the Chicken to Golden Perfection
It’s time to bring on the crisp! Heat a generous amount of oil in a large, heavy-bottomed skillet over medium-high heat. You want enough oil to come about ½ inch up the sides of the pan. A good test for the oil temperature is to drop a tiny pinch of flour into it; if it sizzles immediately, it’s ready. Carefully place 2-3 breaded chicken cutlets into the hot oil, being careful not to overcrowd the pan. Overcrowding will lower the oil temperature and result in soggy chicken.
Fry the chicken for about 4-6 minutes per side, or until it’s golden brown and cooked through. The internal temperature should reach 165°F (74°C) when checked with a meat thermometer. You’ll see a beautiful, crispy crust forming. Use tongs to carefully flip the chicken and ensure even cooking. Once cooked, remove the chicken from the skillet and place it on a clean wire rack set over a baking sheet to drain any excess oil. This step is important for maintaining that delightful crispness. You can also blot them gently with paper towels, but the wire rack method is generally preferred for preserving the crunch. Repeat the frying process with the remaining chicken cutlets, ensuring the oil returns to the correct temperature between batches.
Crafting the Ultimate Caesar Dressing
While our chicken is cooling slightly, let’s whip up the star of the salad portion: our homemade Caesar dressing. In a medium bowl, combine the ½ cup full-fat mayonnaise, 3 tbsp Greek yogurt, 1 tsp Dijon mustard, 1 tsp Worcestershire sauce, and 2 tbsp fresh lemon juice. The Greek yogurt adds a lovely tang and creaminess without being too heavy.
Next, add the ¼ cup freshly grated Parmesan cheese. Freshly grated is key here for the best flavor and texture. Then, add the 1-2 minced garlic cloves. The amount of garlic is to your preference; start with one if you’re sensitive to raw garlic. Season with ¼ tsp black pepper and a pinch of sea salt. Whisk all of these ingredients together until smooth and well combined. Taste and adjust seasoning if needed. If you prefer a thinner dressing, you can add a tiny bit more lemon juice or a splash of water. This dressing is incredibly versatile and can be used on salads, as a dip, or, as we are doing today, as the perfect complement to our crispy chicken.
Assembling Your Masterpiece
Now for the grand finnon-alcoholic ale: assembling the sandwich! We’ll need your favorite sandwich rolls or crusty bread. Lightly toast them if you like for extra texture. Spread a generous amount of our homemade Caesar dressing on both halves of your toasted rolls. Next, place a piece (or two, depending on size) of your perfectly crispy chicken cutlet on the bottom half of the roll. Top the chicken with a handful of fresh, crisp romaine lettuce. If you want to amp up the Caesar flavor even more, drizzle a little extra Caesar dressing over the romaine. Finally, sprinkle with a little extra grated Parmesan cheese for that final salty flourish. Close the sandwich with the top half of the roll and prepare yourself for a flavor explosion.
Tips for Success and Variations
Enjoy your incredibly delicious and satisfying Crispy Chicken Caesar Sandwich! It’s a simple yet impressive meal that’s perfect for lunch or a casual dinner.
Conclusion:
There you have it – the ultimate guide to crafting your very own Crispy Chicken Caesar Sandwich! This recipe is a guaranteed winner because it strikes the perfect balance between satisfying crunch from the fried chicken, the creamy tang of Caesar dressing, and the fresh bite of crisp romaine. It’s more than just a sandwich; it’s a flavor explosion that’s both comforting and exciting, making it ideal for a quick lunch, a hearty dinner, or even a crowd-pleasing appetizer. I really encourage you to give this a try – you won’t be disappointed!
For serving, this delicious sandwich shines on its own, but it also pairs wonderfully with a side of sweet potato fries, a simple green salad, or even some crunchy coleslaw. Get creative with your sides!
Thinking about variations? You can absolutely switch up the greens if romaine isn’t your favorite – try spinach or even arugula for a peppery kick. For a spicier twist, add a pinch of cayenne pepper to your chicken coating or a drizzle of sriracha mayo. And if you’re looking for a lighter option, baked chicken is a fantastic substitute for fried.
I can’t wait for you to experience this fantastic Crispy Chicken Caesar Sandwich yourself!
Frequently Asked Questions:
Can I make the chicken ahead of time?
Yes, you absolutely can! Cook the chicken and let it cool completely. Store it in an airtight container in the refrigerator for up to 2 days. When you’re ready to assemble your sandwich, simply reheat the chicken gently in a pan or oven until warmed through for that perfect crispiness.
What if I don’t have Parmesan cheese for the dressing?
While Parmesan is traditional and adds a wonderful salty depth, you can substitute it with other hard, salty cheeses like Pecorino Romano. If you don’t have any hard cheese, you can still make a delicious creamy dressing with mayonnaise, garlic, lemon juice, and Worcestershire sauce, though it will have a slightly different flavor profile.
Is this sandwich suitable for meal prep?
This Crispy Chicken Caesar Sandwich is best enjoyed fresh to maintain the crispiness of the chicken and the freshness of the ingredients. However, you can prep components separately: cook the chicken, make the dressing, and wash/chop the lettuce. Then, assemble just before serving to ensure the best texture and flavor.
Crispy Chicken Caesar Sandwich
A delicious and satisfying sandwich featuring crispy fried chicken cutlets tossed in a homemade Caesar dressing, served on a bun.
Ingredients
-
½ cup full-fat mayonnaise
-
3 tbsp Greek yogurt
-
1 tsp Dijon mustard
-
1 tsp Worcestershire sauce
-
2 tbsp lemon juice
-
¼ cup Parmesan cheese (freshly grated)
-
1-2 garlic cloves (minced)
-
¼ tsp black pepper
-
Pinch sea salt
-
5 chicken cutlets
-
sea salt (to taste)
-
ground black pepper (to taste)
-
Oil (for frying)
-
⅓ cup all-purpose flour
-
½ tsp salt
Instructions
-
Step 1
In a medium bowl, whisk together the mayonnaise, Greek yogurt, Dijon mustard, Worcestershire sauce, lemon juice, Parmesan cheese, minced garlic, ¼ tsp black pepper, and pinch sea salt until well combined. This is your Caesar dressing. -
Step 2
Pat the chicken cutlets dry with paper towels. Season both sides generously with sea salt and ground black pepper. -
Step 3
In a shallow dish, combine the all-purpose flour, ½ tsp salt, and a pinch of ground black pepper. -
Step 4
Dredge each chicken cutlet in the flour mixture, ensuring it is fully coated. Shake off any excess flour. -
Step 5
Heat enough oil in a large skillet over medium-high heat for frying. Once the oil is hot, carefully add the coated chicken cutlets. Fry for 3-5 minutes per side, or until golden brown and cooked through. -
Step 6
Remove the chicken from the skillet and place on a wire rack to drain any excess oil. Once slightly cooled, you can optionally chop or shred the chicken. -
Step 7
Assemble the sandwiches by placing the crispy chicken cutlets on your preferred sandwich rolls. Drizzle generously with the prepared Caesar dressing. Serve immediately.
Important Information
Nutrition Facts (Per Serving)
It is important to consider this information as approximate and not to use it as definitive health advice.
Allergy Information
Please check ingredients for potential allergens and consult a health professional if in doubt.