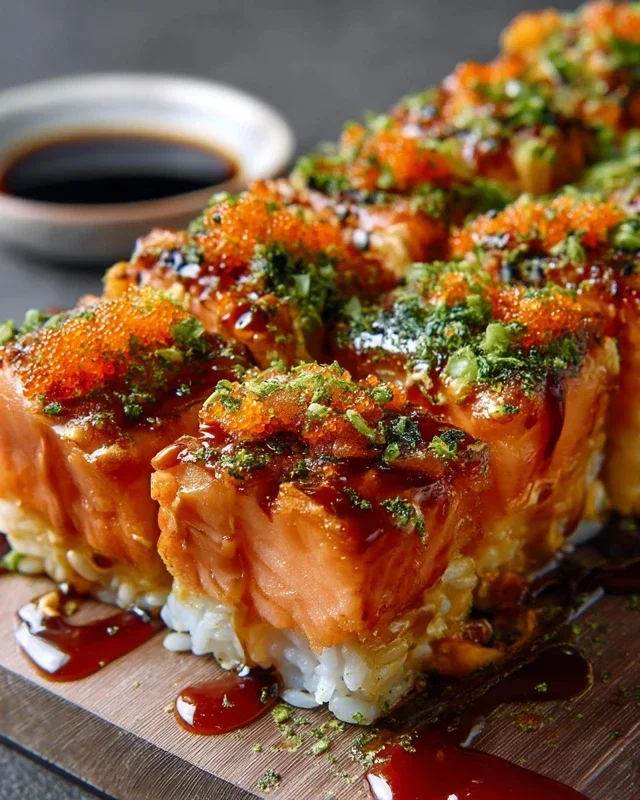
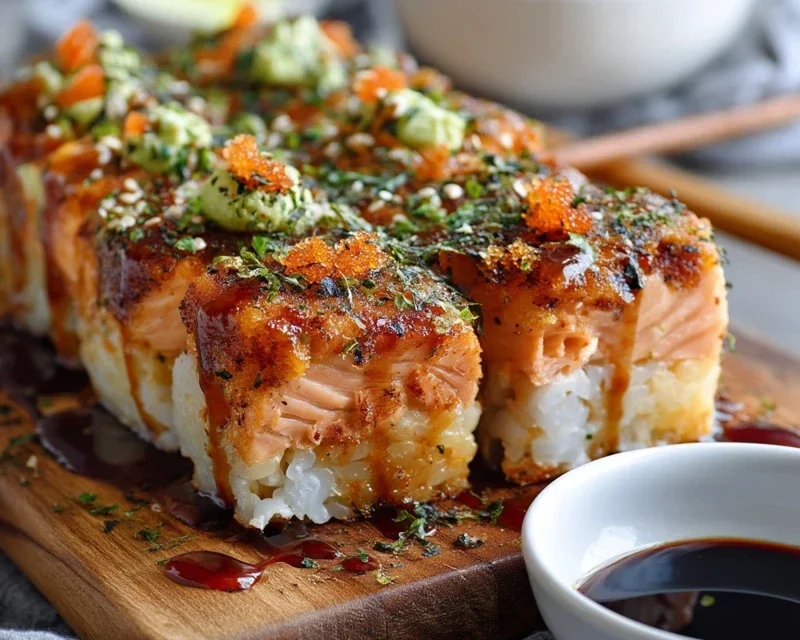
Spicy Salmon Sushi Bake- Easy & Delicious Recipe
Spicy Salmon Sushi Bake Recipe: Get ready to ignite your taste buds with a dish that’s taking the culinary world by storm! If you’ve been dreaming of the complex, savory flavors of your favorite sushi rolls but crave a comforting, shareable meal, then our Spicy Salmon Sushi Bake Recipe is your answer. This isn’t just another casserole; it’s a deconstructed sushi experience baked into a delightful, communal dish that’s perfect for weeknight dinners or impressing guests. Imagin extracte fluffy, seasoned rice forming a tender base, layered with succulent, flaky salmon coated in a creamy, zesty, and yes, delightfully spicy sauce. Topped with crispy nori, crunchy sesame seeds, and a drizzle of sriracha mayo, every bite offers a symphony of textures and tastes that’s both familiar and excitingly new. It’s the ultimate fusion of sushi convenience and baked-dish comfort, and I can’t wait for you to try it!
Spicy Salmon Sushi Bake Recipe
Get ready to impress yourself and your taste buds with this incredibly satisfying Spicy Salmon Sushi Bake! It’s a deconstructed take on your favorite sushi, transformed into a comforting, layered casserole that’s perfect for a weeknight dinner or a fun gathering. The creamy, spicy salmon filling, nestled on a bed of perfectly seasoned sushi rice and topped with a delightful crunch, is simply irresistible. Forget the rolling mats and sticky fingers; this bake makes enjoying sushi flavors easier than ever.
Ingredients:
Cooking Instructions
Let’s get started on this flavor adventure! This recipe is broken down into a few manageable steps, ensuring that even if you’re new to sushi-inspired dishes, you’ll end up with a fantastic result.
1. Preparing the Sushi Rice: The Foundation of Flavor
The first and most crucial step is to get your sushi rice just right. This is what will give your bake that authentic sushi foundation.
2. Crafting the Spicy Salmon Filling: The Heart of the Bake
This is where the ‘spicy’ in our recipe truly comes alive. The combination of creamy mayonnaise and fiery Sriracha is classic and addictive.
3. Assembling Your Culinary Masterpiece
Now it’s time to bring all the delicious components together in your baking dish. This layered approach is what makes the sushi bake so satisfying.
4. Baking to Perfection and Adding the Final Flourishes
The baking process melds the flavors and creates a wonderfully creamy and slightly crisp topping.
5. Serving Your Delectable Sushi Bake
The grand finnon-alcoholic ale! Serving this sushi bake is almost as enjoyable as eating it.
Enjoy this incredibly flavorful and easy-to-make Spicy Salmon Sushi Bake! It’s a guaranteed hit.
Conclusion:
I hope you’re as excited about this Spicy Salmon Sushi Bake Recipe as I am! This dish truly hits all the right notes: it’s incredibly flavorful, surprisingly easy to make, and offers a fantastic, deconstructed take on your favorite sushi rolls. The creamy, spicy salmon filling, combined with the seasoned sushi rice and crispy topping, creates a wonderfully satisfying texture and taste sensation. It’s the perfect weeknight meal that feels special enough for guests but requires minimal fuss.
For serving, I love to enjoy this sushi bake with a side of pickled gin extractger, a dollop of extra spicy mayo, and a sprinkle of toasted sesame seeds. Fresh avocado slices or a light cucumber salad also make excellent accompaniments. Don’t be afraid to get creative with your own variations! You could easily swap the salmon for cooked shrimp or even imitation crab for a different flavor profile. Adding in some chopped scallions or a pinch of furikake to the rice mixture before baking can elevate it even further.
So, dive in and give this Spicy Salmon Sushi Bake Recipe a try! I’m confident you’ll love the delicious results and the fun, interactive way to enjoy sushi flavors. Happy cooking!
Frequently Asked Questions:
Can I make this recipe ahead of time?
Absolutely! You can prepare the sushi rice and the spicy salmon mixture separately and refrigerate them. Assemble the bake just before you’re ready to cook it. You might need to add a few extra minutes to the baking time if it’s going into the oven cold.
What kind of salmon should I use?
I recommend using cooked salmon that’s been flaked. You can use leftover baked or grilled salmon, or quickly pan-sear or poach fresh salmon before flaking it. Ensure any raw salmon used is sushi-grade if you plan to consume it raw within the bake, though cooking it first is generally safer and simpler for this recipe.
Is this recipe very spicy?
The spice level can be easily adjusted! The recipe uses sriracha and a touch of chili powder, but you can add more or less to suit your preference. For a milder bake, reduce the sriracha and omit the chili powder. For extra heat, add a pinch of cayenne pepper or a dash of your favorite hot sauce.
Spicy Salmon Sushi Bake Recipe
A delicious and easy-to-make spicy salmon sushi bake with fluffy sushi rice, creamy sriracha salmon, and savory nori.
Ingredients
-
2 cups sushi rice (uncooked)
-
2.5 cups water
-
1/4 cup rice vinegar
-
2 tablespoons sugar
-
1 teaspoon salt
-
1 lb fresh salmon fillet (skinless and diced)
-
1/2 cup mayonnaise
-
2 tablespoons Sriracha sauce (or to taste)
-
1 teaspoon sesame oil
-
1/2 cup green onions (chopped, plus extra for garnish)
-
1 sheet nori (cut into small strips)
-
tobiko (optional for garnish)
Instructions
-
Step 1
Cook sushi rice according to package directions. While rice is cooking, mix rice vinegar, sugar, and salt in a small bowl until sugar and salt are dissolved. Once rice is cooked, gently fold the vinegar mixture into the hot rice. -
Step 2
In a medium bowl, combine diced salmon, mayonnaise, Sriracha sauce, and sesame oil. Mix well until the salmon is evenly coated. -
Step 3
Fold in the chopped green onions into the salmon mixture. -
Step 4
In a greased 8×8 inch baking dish, spread the seasoned sushi rice evenly. Top the rice with the spicy salmon mixture, spreading it into an even layer. -
Step 5
Bake in a preheated oven at 400°F (200°C) for 25-30 minutes, or until the salmon is cooked through and the top is lightly golden. -
Step 6
Garnish with nori strips, extra chopped green onions, and optional tobiko before serving.
Important Information
Nutrition Facts (Per Serving)
It is important to consider this information as approximate and not to use it as definitive health advice.
Allergy Information
Please check ingredients for potential allergens and consult a health professional if in doubt.