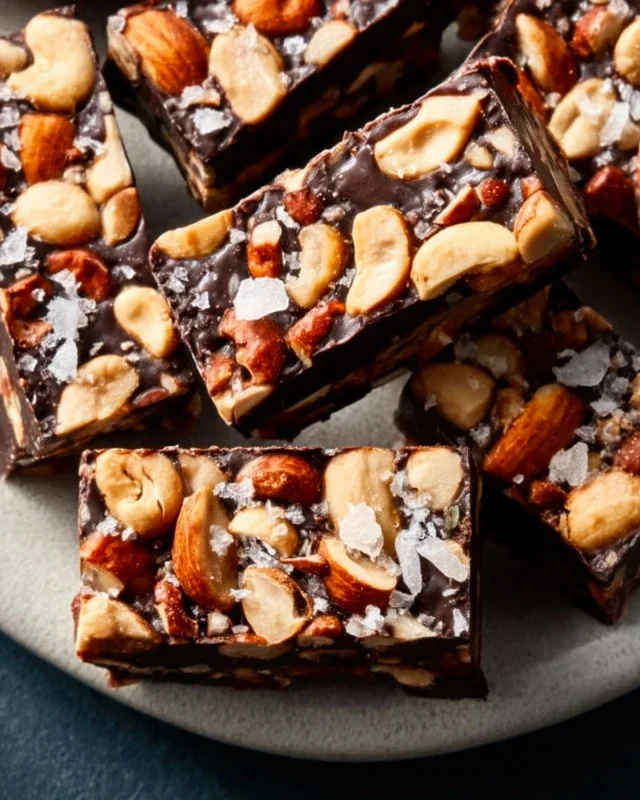
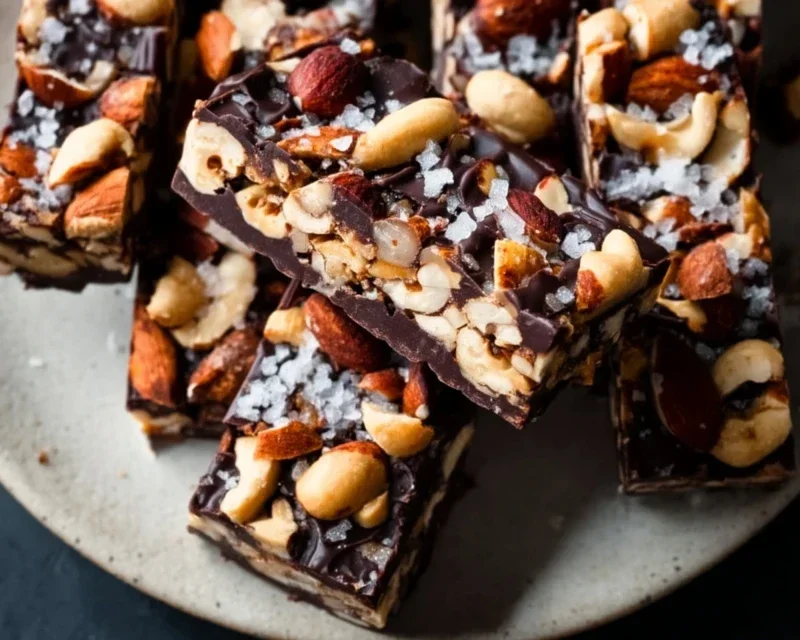
Dark Chocolate Sea Salt Nut Bars-Easy Recipe
Dark Chocolate and Sea Salt Nut Bars are about to become your new obsession. I know, I know – another snack bar recipe? But trust me, this isn’t just any snack bar. This is a flavor revelation, a textural masterpiece, and quite frankly, a little piece of edible heaven. If you’re anything like me, you crave that perfect balance of sweet and salty, rich and crunchy. That’s exactly what these bars deliver. The deep, satisfying bitterness of dark chocolate melts into the crunchy, satisfying bite of roasted nuts, all brought together by a delicate whisper of sea salt that elevates every single flavor note. They’re incredibly satisfying, perfect for that afternoon pick-me-up, a pre-workout fuel, or simply a decadent treat you can feel a little bit good about. Prepare to be hooked on these delightful Dark Chocolate and Sea Salt Nut Bars!
Ingredients:
Whip Up These Irresistible Dark Chocolate and Sea Salt Nut Bars!
There’s something incredibly satisfying about a homemade treat that’s both delicious and relatively good for you. These Dark Chocolate and Sea Salt Nut Bars hit all the right notes. They’re packed with the satisfying crunch of nuts, the airy lightness of puffed rice, and the decadent allure of dark chocolate, all brought together with a touch of sea salt to elevate every flavor. Whether you’re looking for a quick breakfast on the go, an afternoon energy boost, or a healthier dessert option, these bars are a winner. They’re surprisingly simple to make, requiring no baking and just a few core ingredients. Let’s get started on creating these little powerhouses of flavor!
Preparing Your Base
The foundation of these bars lies in the perfect blend of nuts and puffed rice. The variety of nuts you choose is entirely up to your preference, but a mix offers a more complex flavor and texture. We love using cashews for their creamy sweetness, peanuts for their classic nuttiness, and almonds for their slight crunch and earthy notes. Toasting your nuts beforehand can really enhance their flavor, bringin extractg out their natural oils and adding a deeper dimension. Simply spread them on a baking sheet and toast them in a preheated oven at 350°F (175°C) for about 8-10 minutes, or until fragrant. Keep a close eye on them as nuts can go from perfectly toasted to burnt very quickly! Once toasted, let them cool completely before proceeding. This cooling step is crucial; warm nuts can affect the texture of the finished bars.
Next, we incorporate the puffed rice. This ingredient adds a delightful lightness and crunch, preventing the bars from becoming too dense. When combining the nuts and puffed rice, you want a good distribution. I like to give the puffed rice a gentle toss with the nuts to ensure it’s evenly spread throughout the mixture. This way, every bite will offer that satisfying contrast of textures.
Binding It All Together
This is where the magic happens – transforming the dry ingredients into cohesive, sliceable bars. The brown rice syrup is our primary binder. It’s a fantastic sweetener that also provides a wonderful chewy texture. Be sure to have your measuring cup ready, as accurately measuring the syrup is key to achieving the right consistency.
In a saucepan, gently warm the brown rice syrup over medium-low heat. You don’t want it to boil vigorously, just to become more fluid and easier to mix. Stir in the vanilla extract and the sea salt. The vanilla adds a warm, comforting aroma and flavor, while the sea salt is not just for taste; it actually enhances the sweetness of the chocolate and the nuttiness of the nuts. A good quality sea salt, like Maldon or Fleur de Sel, will provide beautiful little pops of salty flavor that contrast wonderfully with the sweetness.
Once the syrup mixture is warm and the salt is dissolved, pour it over the prepared nut and puffed rice mixture. This is the stage where you’ll need to be a bit enthusiastic with your stirring. You want to ensure that every single piece of nut and every puff of rice is coated in the sticky syrup. Use a sturdy spatula or a wooden spoon to thoroughly mix everything together. It might seem like a lot of syrup, but trust me, it will all come together to create that perfect bar consistency. Take your time here; thorough mixing means your bars won’t crum extractble apart when you try to cut them.
Adding the Chocolatey Delight
Now for the star of the show for many – the dark chocolate! We’re going to create a luscious chocolate drizzle that will add a decadent finish to our bars. In a separate small bowl, combine the dark chocolate chips with the coconut oil. Coconut oil is excellent for chocolate drizzles because it helps the chocolate melt smoothly and sets up nicely, giving the bars a beautiful shine.
You can melt this mixture using one of two methods:
1. Microwave Method: Place the bowl in the microwave and heat in 30-second intervals, stirring well after each interval, until the chocolate is mostly melted and smooth. Be careful not to overheat the chocolate, as it can seize and become grainy.
2. Double Boiler Method: Fill a small saucepan with about an inch of water and bring it to a gentle simmer. Place the bowl with the chocolate chips and coconut oil over the saucepan, ensuring the bottom of the bowl does not touch the water. Stir constantly until the chocolate is melted and smooth.
Once melted, stir the chocolate until it’s completely smooth and glossy. This smooth, melted chocolate will be used to either coat the top of the bars or to create a beautiful marbled effect.
Assembly and Finishing Touches
Line a square or rectangular baking pan (an 8×8 inch pan is usually a good size) with parchment paper, leaving some overhang on the sides. This overhang will act as handles to easily lift the bars out of the pan once they’ve set. Pour the nut and syrup mixture into the prepared pan. Now, this is where you’ll need to apply some pressure. Use the back of a spatula or a piece of parchment paper to firmly press the mixture into an even layer. The firmer you press, the more cohesive your bars will be. Get right into the corners to ensure an even thickness throughout.
Once the base is firmly pressed, gently pour the melted dark chocolate over the top. You can spread it evenly with your spatula for a solid chocolate layer, or use a fork or toothpick to create a marbled effect by swirling it with the nut mixture. This is also where you can add your optional flaky salt. Sprinkle it generously over the melted chocolate. The contrast of the flaky salt against the rich dark chocolate is simply divine.
Chilling and Enjoying
Place the pan in the refrigerator for at least 1-2 hours, or until the chocolate has completely set and the bars are firm. Once chilled and firm, use the parchment paper overhang to lift the entire slab out of the pan. Place it on a cutting board and use a sharp knife to cut it into your desired bar sizes. Store these delicious bars in an airtight container in the refrigerator for up to a week. They’re best enjoyed cold, offering that satisfying crunch and a burst of flavor with every bite. Enjoy your homemade goodness!
Conclusion:
There you have it – a foolproof guide to creating these irresistible Dark Chocolate and Sea Salt Nut Bars! These bars are a true triumph of flavor and texture, offering a delightful balance of rich, bittersweet dark chocolate, the satisfying crunch of your favorite nuts, and that addictive hint of sea salt. They’re incredibly versatile, making them the perfect grab-and-go snack for busy mornings, a satisfying post-workout treat, or even an elegant accompaniment to your afternoon coffee. Don’t be afraid to get creative with your nut choices; almonds, walnuts, pecans, or a mix will all yield delicious results. For an added twist, consider incorporating a sprinkle of chili flakes for a touch of heat, or some toasted coconut for extra tropical flair. I truly encourage you to give this Dark Chocolate and Sea Salt Nut Bars recipe a try – I’m confident you’ll love them as much as I do!
Frequently Asked Questions:
Can I use milk chocolate instead of dark chocolate?
Absolutely! While dark chocolate provides a richer, more complex flavor that beautifully complements the salt and nuts, milk chocolate will still create a delicious bar. Just be aware that the overall sweetness will increase, so you might want to adjust the salt slightly to maintain that perfect sweet and salty balance.
How should I store these nut bars?
For best results, store your Dark Chocolate and Sea Salt Nut Bars in an airtight container at room temperature for up to a week. If your kitchen tends to be very warm, you might prefer to store them in the refrigerator to prevent the chocolate from softening too much. They also freeze wonderfully, so feel free to make a big batch and enjoy them for weeks to come!
Dark Chocolate and Sea Salt Nut Bars
Chewy and satisfying bars packed with mixed nuts, puffed rice, and drizzled with dark chocolate and flaky sea salt.
Ingredients
-
2 1/2 cups unsalted nuts of choice (3/4 cup cashews, 3/4 cup peanuts, 1 cup almonds)
-
1/2 cup puffed rice
-
1/4 cup brown rice syrup
-
1 1/2 teaspoon vanilla extract
-
1/2 teaspoon sea salt
-
1 cup dark chocolate chips
-
2 teaspoons coconut oil
-
Flaky salt for topping (optional)
Instructions
-
Step 1
In a large bowl, combine the nuts and puffed rice. Stir to distribute evenly. -
Step 2
In a small saucepan over low heat, warm the brown rice syrup and vanilla extract until just combined. Do not boil. -
Step 3
Pour the warm syrup mixture over the nut and puffed rice mixture. Add the 1/2 teaspoon of sea salt. Stir well until everything is coated. -
Step 4
Press the mixture firmly into a parchment-lined 8×8 inch baking pan. Ensure it’s tightly packed. -
Step 5
In a microwave-safe bowl, combine the dark chocolate chips and coconut oil. Microwave in 30-second intervals, stirring between each, until melted and smooth. -
Step 6
Pour the melted dark chocolate over the pressed nut mixture, spreading it evenly with a spatula. Sprinkle with flaky salt, if using. -
Step 7
Refrigerate for at least 30 minutes, or until the chocolate is set. Cut into bars.
Important Information
Nutrition Facts (Per Serving)
It is important to consider this information as approximate and not to use it as definitive health advice.
Allergy Information
Please check ingredients for potential allergens and consult a health professional if in doubt.