Easy Easter Toffee Recipe – Delicious Homemade Treat
Easter toffee is a delightful treat that truly captures the spirit of springtime celebrations. There’s something incredibly magical about a batch of homemade Easter toffee – the satisfying snap, the rich buttery caramel, and the decadent chocolate topping. It’s the kind of confection that evokes cherished childhood memories and brings smiles to faces of all ages. This isn’t just any candy; it’s a centerpiece of our Easter gatherings, a sweet tradition we look forward to year after year. What makes this particular Easter toffee so special is its perfect balance of textures and flavors. It’s surprisingly easy to make, too, meaning you can spend less time stressing in the kitchen and more time enjoying the company of loved ones. Get ready to create a truly unforgettable Easter treat that will be the talk of your dessert table!
Why You’ll Adore This Easter Toffee
The Perfect Sweet Ending
This Easter toffee is the ultimate sweet ending to any festive meal. Its simple elegance and irresistible taste make it a guaranteed crowd-pleaser. Imagin extracte the delight as your guests break off their own pieces of this golden, crunchy goodness. It’s a sensory experience that truly elevates the holiday.
What Makes It Uniquely Easter?
A Taste of Spring
Beyond the incredible flavor, the charm of this Easter toffee lies in its festive appeal. Whether you choose to adorn it with pastel sprinkles, mini chocolate eggs, or edible glitter, it transforms into a whimsical masterpiece that perfectly complements your Easter décor. It’s more than just a dessert; it’s a delicious expression of the season’s joy.

Easter Toffee
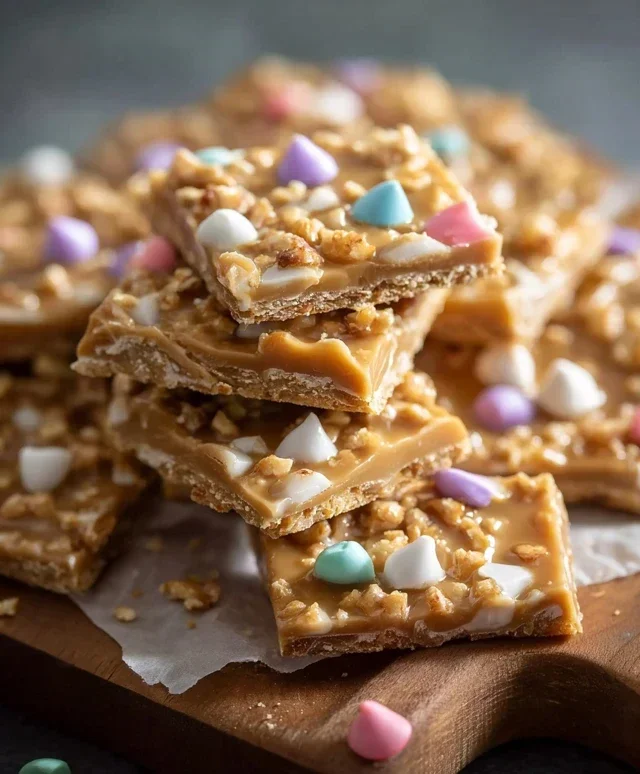
This Easter Toffee is an absolute showstopper and surprisingly easy to make! Imagin extracte a crunchy, buttery toffee base, covered in creamy white chocolate, and then adorned with the most festive Easter and springtime sprinkles and candies. It’s the perfect treat to share with family and friends during the holiday, or even to package up as charming edible gifts. The beauty of this recipe lies in its simplicity and its adaptability – you can truly customize it to your heart’s content. Get ready for rave reviews, because this Easter Toffee is guaranteed to disappear fast!
Ingredients:
Instructions:
Prepare Your Baking Sheet:
First things first, let’s get our workspace ready. Preheat your oven to 350°F (175°C). Now, line a large baking sheet (around 10×15 inches is ideal, but a standard half-sheet pan works too) with parchment paper or aluminum foil. Make sure the parchment or foil overhangs the sides of the baking sheet slightly – this will be a lifesaver when it’s time to lift the toffee out. Next, we’re going to arrange our Saltine crackers in a single, snug layer across the parchment-lined baking sheet. You want them to fit snugly, without too much overlapping, as this will form the base of our delicious toffee. If your crackers don’t quite fill the entire pan, don’t worry; you can break a few to fill in any gaps. The key is to create an even foundation.
Create the Buttery Toffee Base:
In a medium saucepan, combine the butter and the packed dark brown sugar. Place the saucepan over medium heat. Stir constantly with a whisk or wooden spoon. You’ll want to bring the mixture to a boil. Once it starts boiling, continue to cook and stir for approximately 5 minutes. It’s crucial to keep stirring throughout this process to prevent the sugar from burning and to ensure an even caramelization. The mixture will thicken and turn a beautiful deep caramel color. This bubbling, rich mixture is the heart of our toffee, so take your time and let it develop its wonderful flavor. Be cautious, as the caramel will be very hot.
Assemble and Bake the Cracker Layer:
Once the brown sugar mixture has cooked for 5 minutes and looks smooth and glossy, carefully pour it evenly over the prepared Saltine crackers on the baking sheet. Use a heatproof spatula to gently spread the caramel so it covers the crackers as much as possible, creating a unified layer. Don’t worry if there are a few small gaps; the caramel will spread a bit more in the oven. Now, carefully transfer the baking sheet to the preheated oven. Bake for about 5-7 minutes, or until the caramel is bubbly and the edges look slightly golden. Keep a close eye on it during this stage; we don’t want the caramel to burn.
Melt and Spread the White Chocolate:
While the cracker base is in the oven, let’s get our white chocolate ready. You have a couple of options here. You can melt the white chocolate chips in a microwave-safe bowl in 30-second intervals, stirring between each interval until smooth and creamy. Alternatively, you can use a double boiler method, melting the chocolate gently over simmering water. Once melted, if you’re using gel food coloring, stir in 1-2 drops of your chosen pastel color. Remember, gel coloring is very potent, so a little goes a long way! Red will give you a lovely pink hue, and green will create a beautiful pastel green. Stir gently until the color is evenly distributed. As soon as the cracker-caramel layer comes out of the oven, immediately pour the melted white chocolate over the hot caramel and crackers. Use your heatproof spatula to spread it evenly, ensuring all the crackers are covered. Work quickly, as the chocolate will start to set.
Decorate and Chill:
Now for the fun part – decorating! While the white chocolate is still wet, generously sprinkle your Easter and Springtime-themed sprinkles and candies all over the toffee. Go wild with your imagin extractation! Think pastel sprinkles, candy eggs, little chicks, bunnies, or even edible glitter. The more festive, the better! Once you’ve adorned your toffee to your heart’s content, carefully place the baking sheet in the refrigerator. Let it chill for at least 1-2 hours, or until the white chocolate is completely firm and set. This chilling process is essential for achieving that satisfyingly brittle toffee texture. Once it’s thoroughly chilled, you can gently lift the entire sheet of toffee off the baking sheet using the overhangin extractg parchment or foil. Break it into bite-sized pieces with your hands or a sharp knife. Store your finished Easter Toffee in an airtight container at room temperature for up to a week, or in the refrigerator for longer storage. Enjoy this delightful homemade treat!
Conclusion:
I hope you’re as excited to try this Easter Toffee recipe as I am to share it! It’s truly a fantastic treat, offering that perfect crunch of caramelized sugar combined with the rich sweetness of chocolate, all elevated by the festive spirit of Easter. The simplicity of the ingredients and the straightforward method make it an approachable yet impressive dessert, ideal for anyone looking to add a homemade touch to their holiday celebrations. This Easter Toffee isn’t just delicious; it’s a delightful project that brings joy to the kitchen and smiles to faces as it’s shared. Imagin extracte breaking off shards of this golden goodness, each bite a delightful testament to your baking efforts.
Serving this toffee is wonderfully versatile. It’s magnificent on its own, of course, presented in an attractive bowl for guests to help themselves. I also love breaking it into irregular pieces and scattering them over ice cream or a slice of vanilla cake for an extra layer of texture and flavor. For a truly festive presentation, arrange pieces artfully on a platter alongside other Easter treats. If you’re feeling adventurous, consider variations! You could add a sprinkle of sea salt on top of the chocolate for a salted caramel effect, or even fold in some chopped nuts like pecans or almonds with the chocolate. The possibilities are endless, and the reward is a truly spectacular homemade Easter delight. Don’t hesitate to give this Easter Toffee a try – I promise you won’t be disappointed!
Frequently Asked Questions:
Can I make this Easter Toffee ahead of time?
Absolutely! This Easter Toffee is an excellent make-ahead treat. Once it’s completely cooled and set, store it in an airtight container at room temperature. It stays wonderfully crisp for up to a week, making it perfect for busy holiday schedules.
What if I don’t have a candy thermometer?
While a candy thermometer ensures precise results, you can often achieve success without one. The “hard-ball stage” is roughly 300°F (150°C). To test without a thermometer, drop a small amount of the hot sugar syrup into a glass of ice-cold water. It should form a firm, brittle ball that cracks when removed from the water. Be cautious, as this method requires practice and careful observation.
Easter Toffee
A festive and easy-to-make toffee perfect for Easter celebrations, featuring a sweet cracker base, rich brown sugar topping, and colorful white chocolate decorations.
Ingredients
-
48 Saltine crackers (regular), or more depending on the size of your baking sheet
-
1 cup (2 sticks) unsalted butter
-
1 cup dark brown sugar, packed
-
6 ounces white chocolate chip morsels (best quality possible)
-
1-2 drops of gel food coloring (optional, red for pink and green for pastel colors)
-
Easter and Springtime-themed sprinkles and candy, to taste.
Instructions
-
Step 1
Preheat oven to 350°F (175°C). Line a baking sheet with parchment paper or a silicone baking mat. -
Step 2
Arrange the saltine crackers in a single layer on the prepared baking sheet, covering the surface as much as possible. Break crackers to fit if necessary. -
Step 3
In a medium saucepan, combine the unsalted butter and packed dark brown sugar. Bring to a boil over medium heat, stirring constantly. Boil for 3 minutes, stirring continuously. -
Step 4
Pour the hot sugar mixture evenly over the saltine crackers on the baking sheet. Spread quickly to cover the crackers. -
Step 5
Bake for 5 minutes, or until the topping is bubbly. -
Step 6
Remove from oven and immediately sprinkle the white chocolate chip morsels evenly over the hot toffee. Let stand for 5 minutes to melt. -
Step 7
If using, gently swirl in the gel food coloring into the melted white chocolate. Sprinkle liberally with Easter and Springtime-themed sprinkles and candy. -
Step 8
Let cool completely at room temperature until hardened, about 1-2 hours. Break into pieces.
Important Information
Nutrition Facts (Per Serving)
It is important to consider this information as approximate and not to use it as definitive health advice.
Allergy Information
Please check ingredients for potential allergens and consult a health professional if in doubt.