Daisy Lemon Meringue Pies are more than just a dessert; they’re a nostalgic embrace of sunshine and sweetness. Imagin extracte biting into a cloud-like meringue, its delicate sweetness giving way to a vibrant, tangy lemon custard, all nestled within a buttery, crisp crust. It’s no wonder the Daisy Lemon Meringue Pie holds such a special place in so many hearts. This iconic treat is a celebration of contrasts – the airy lightness of the meringue against the rich depth of the lemon filling, the gentle sweetness playing off the bright citrus. What truly sets a homemade Daisy Lemon Meringue Pie apart is the love and care infused into every step, transforming simple ingredients into a show-stopping masterpiece that’s perfect for any occasion, from a casual Sunday brunch to a special celebratory dessert.
Daisy Lemon Meringue Pies
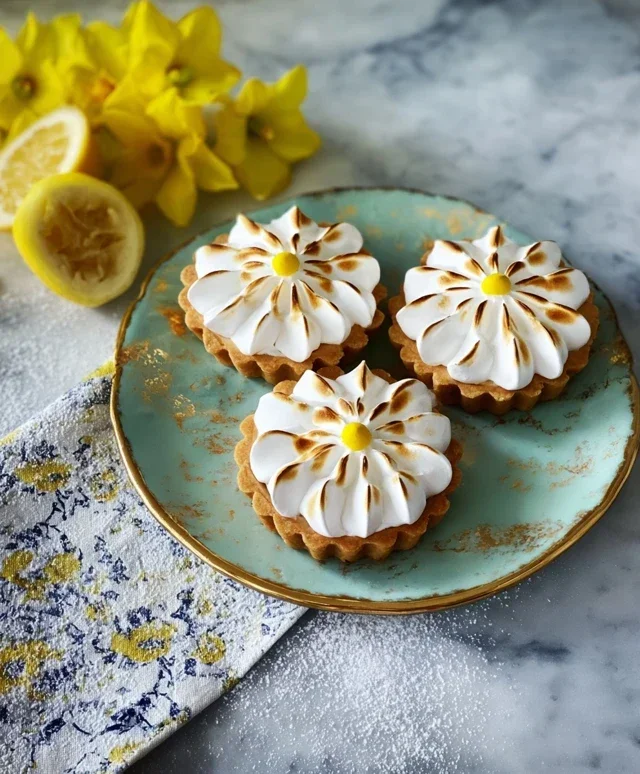
There’s something incredibly charming and utterly delicious about a Daisy Lemon Meringue Pie. The sunshine-bright lemon filling, kissed with a fluffy cloud of meringue, all nestled within a crisp, buttery crust – it’s a classic for a reason. While it might seem a little daunting to tackle a meringue pie, I promise you, with a little patience and these clear instructions, you’ll be whipping up these delightful daisy-inspired treats in no time. The “daisy” effect comes from how we pipe the meringue, creating delicate petals that bake to a beautiful golden brown.
Ingredients:
125g plain flour
35g icing sugar
60g cold unsalted butter
1 large egg yolk
1 tbsp water
For the Lemon Filling:
300ml water
150g granulated sugar
40g cornflour
4 large egg yolks
80ml fresh lemon juice (from about 2-3 lemons)
30g unsalted butter
For the Meringue:
4 large egg whites (from the yolks used for the filling)
200g granulated sugar
1 tsp lemon extract (optional, for an extra lemon punch)
Instructions:
Making the Pie Crust:
First things first, let’s get our pastry base ready. In a medium bowl, combine the 125g plain flour and 35g icing sugar. Give them a quick whisk to ensure they’re well mixed. Then, add the 60g of cold, cubed unsalted butter. Using your fingertips, or a pastry blender if you have one, rub the butter into the flour mixture until it resembles coarse breadcrum extractbs. You want to see little pea-sized lumps of butter still visible – these are crucial for creating a flaky crust. Don’t overwork the dough at this stage, as this can make the pastry tough.
Now, it’s time to bring the dough together. In a small bowl, lightly whisk the 1 large egg yolk with the 1 tbsp of water. Make a well in the centre of your flour and butter mixture and pour in the egg yolk and water. Gently bring the dough together with a knife or a spatula until it just starts to form a cohesive ball. Again, avoid kneading; you’re just aiming to combine the ingredients. If the dough seems a little dry, you can add another teaspoon of cold water, but be sparing. Wrap the dough tightly in cling film and refrigerate for at least 30 minutes. This chilling period is essential for resting the gluten and making the dough easier to roll out.
Once chilled, lightly flour your work surface and your rolling pin. Roll out the pastry to a circle large enough to line your pie dish (approximately 23cm or 9-inch pie dish). Gently lift the pastry and carefully line the dish, pressing it into the corners and up the sides. Trim any excess pastry from the edges, leaving a small overhang which you can then crimp decoratively. Prick the base of the pastry all over with a fork. This prevents the pastry from puffing up too much during blind baking. Place the pastry-lined dish in the freezer for another 15 minutes to help prevent shrinkage. While that’s chilling, preheat your oven to 190°C (170°C fan/Gas Mark 5).
Blind bake your pie crust. Line the chilled pastry shell with baking parchment, filling it with baking beans, dried rice, or even dried chickpeas to weigh it down. Bake for 15 minutes. Carefully remove the parchment and weights and bake for a further 5-7 minutes, or until the crust is pnon-alcoholic ale golden and looks dry. This process ensures a crisp base that won’t become soggy from the filling. Let the baked crust cool slightly before filling.
Preparing the Luscious Lemon Filling:
In a medium saucepan, whisk together the 40g cornflour and 150g granulated sugar. Gradually whisk in the 300ml water until smooth. Place the saucepan over medium heat and cook, stirring constantly, until the mixture thickens and comes to a gentle boil. Let it boil gently for about 1 minute, continuing to stir, to ensure the cornflour is fully cooked. Remove from the heat.
In a separate bowl, whisk together the 4 large egg yolks. Slowly temper the egg yolks by gradually whisking about half a cup of the hot cornflour mixture into the yolks, a little at a time. This gradually raises the temperature of the yolks, preventing them from scrambling. Once tempered, pour the egg yolk mixture back into the saucepan with the remaining cornflour mixture.
Return the saucepan to medium-low heat and cook, stirring constantly, for another 2-3 minutes, until the filling is thick and glossy. Do not boil at this stage. Remove from the heat and stir in the 80ml of fresh lemon juice and the 30g of unsalted butter until the butter is completely melted and the filling is smooth and luxurious. Pour the hot lemon filling into your pre-baked and slightly cooled pie crust. Smooth the top with a spatula.
Whipping Up the Perfect Meringue:
Now for the grand finnon-alcoholic ale – the meringue! Make sure your bowl and whisk are scrupulously clean and free from any grease. Add the 4 large egg whites to the bowl. Start whisking on a medium speed until soft peaks form. These are peaks that hold their shape but curl over at the tips.
Gradually add the 200g granulated sugar, one tablespoon at a time, while continuing to whisk. Increase the speed to high. Keep whisking until the meringue is thick, glossy, and all the sugar has dissolved. You can test this by rubbing a little meringue between your thumb and forefinger – it should feel smooth, not gritty. If you’re using it, whisk in the 1 tsp of lemon extract at this stage for an extra zing.
This is where we create our “daisy” effect. Spoon the meringue over the hot lemon filling, spreading it gently to the edges of the crust. You want to ensure the meringue seals the filling all the way to the crust to prevent weeping. Using a piping bag with a star nozzle, pipe small, petal-like shapes all over the meringue. Start from the outside edge and work your way inwards, overlapping the petals to create a beautiful, floral design. You can also achieve a lovely effect by simply swirling the meringue with the back of a spoon, creating peaks and valleys.
Bake the pie in the preheated oven at 170°C (150°C fan/Gas Mark 3) for 20-25 minutes, or until the meringue is golden brown and crisp on the outside. Keep a close eye on it, as meringues can brown quickly. Once baked, turn off the oven, leave the door slightly ajar (you can use a wooden spoon to prop it open), and let the pie cool in the oven for about 30 minutes. This gradual cooling helps to prevent the meringue from cracking. Remove from the oven and let it cool completely on a wire rack before slicing and serving. Enjoy the bright, tangy flavour and the sweet, airy topping of your beautiful Daisy Lemon Meringue Pie!

Conclusion:
As we wrap up our journey to creating the perfect Daisy Lemon Meringue Pie, I hope you feel inspired to bring this delightful dessert into your own kitchen. The balance of tart lemon curd and sweet, fluffy meringue atop a buttery crust is truly a classic for a reason. It’s a showstopper that tastes as good as it looks, perfect for celebrations, a weekend treat, or whenever you need a burst of sunshine on a plate. Don’t be intimidated by the meringue; with a little care and patience, you’ll achieve those beautiful peaks that make this pie so special. Feel free to experiment with fresh berries for a colorful garnish or even add a hint of lavender to the lemon filling for a unique floral note. I wholeheartedly encourage you to give this Daisy Lemon Meringue Pie a try – the effort is absolutely worth the reward!
Frequently Asked Questions:
Can I make the lemon curd and meringue ahead of time?
Yes, you absolutely can! The lemon curd can be made a day or two in advance and stored in an airtight container in the refrigerator. Meringue is best made fresh just before topping the pie for optimal texture and stability. However, if you need to prepare it slightly ahead, ensure it’s covered very tightly with plastic wrap to prevent drying.
What if my meringue starts weeping or turns watery?
Meringue weeping is often caused by under-whipping the egg whites or high humidity. Ensure your egg whites are at room temperature and free from any yolk. Whip them until they form stiff, glossy peaks. Also, try to bake the pie on a dry day if possible. Once baked, cool the pie gradually to prevent drastic temperature changes that can also contribute to weeping.
Are there any other citrus fruits I can use instead of lemons?
While the classic is lemon, you can certainly get creative! A lime meringue pie offers a wonderful tartness, and a blend of lemon and lime can create a more complex citrus flavor. You could even try a grapefruit meringue pie for a slightly more bitter and sophisticated taste. Just be mindful of adjusting the sugar in your curd based on the sweetness of the fruit you choose.
Ingredients
-
125g plain flour
-
35g icing sugar
-
60g cold unsalted butter
-
1 large egg yolk
-
1 tbsp water
-
200ml lemon juice
-
150g caster sugar
-
4 large egg whites
-
1 tsp cream of tartar
Instructions
-
Step 1
For the pastry: Rub the butter into the flour and icing sugar until it resembles breadcrumbs. Mix in the egg yolk and water to form a firm dough. Chill for 30 minutes.
-
Step 2
Preheat oven to 190°C (170°C fan/Gas Mark 5). Roll out the pastry and line 4 individual pie tins. Prick the bases with a fork and blind bake for 10 minutes.
-
Step 3
For the filling: Whisk together lemon juice, caster sugar and the remaining egg yolk until combined. Pour into the blind-baked pie cases.
-
Step 4
Bake for another 15 minutes until the filling is set. Remove from oven and cool completely.
-
Step 5
For the meringue: Whisk egg whites and cream of tartar until stiff peaks form. Gradually add the remaining caster sugar, whisking continuously until smooth and glossy.
-
Step 6
Spoon or pipe the meringue over the cooled lemon filling, ensuring it touches the edges of the pastry to prevent shrinking. Brown the meringue under a preheated grill or in a hot oven for 2-3 minutes.
Important Information
Nutrition Facts (Per Serving)
It is important to consider this information as approximate and not to use it as definitive health advice.
Allergy Information
Please check ingredients for potential allergens and consult a health professional if in doubt.