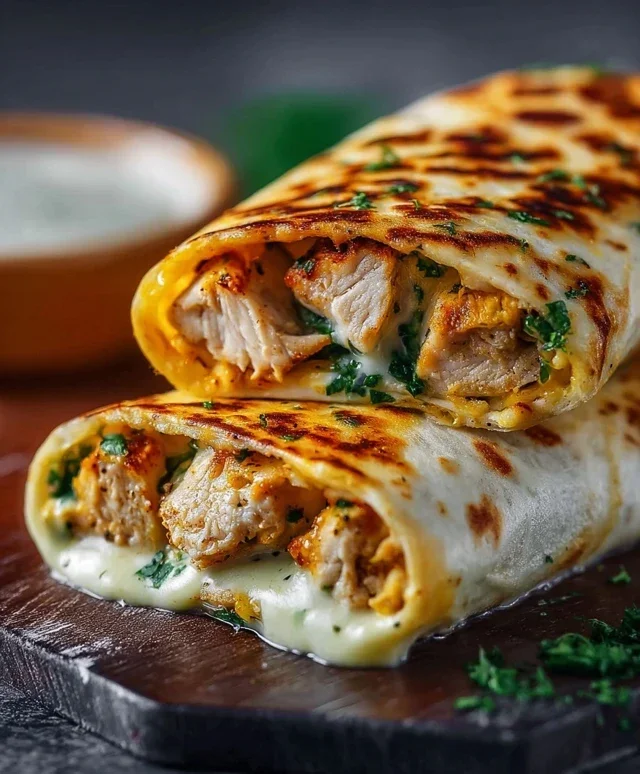
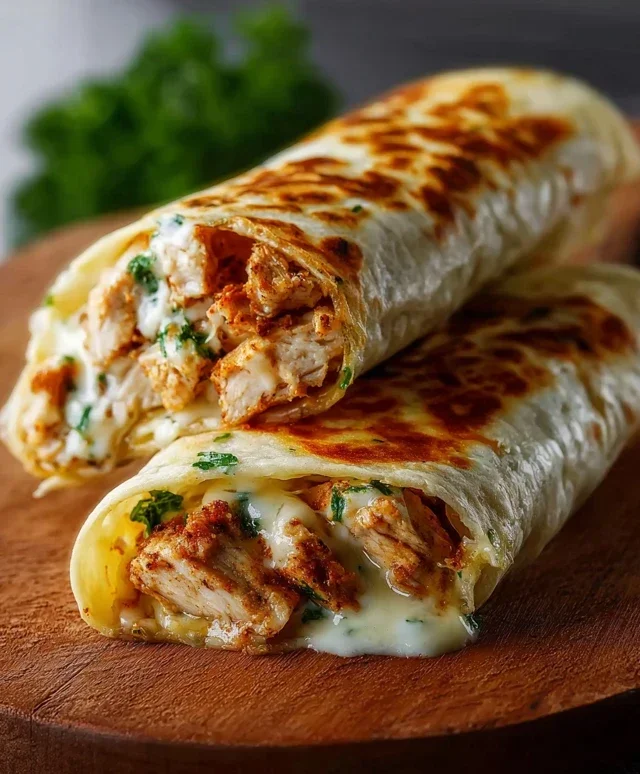
Cheesy Garlic Chicken Wraps – Easy & Delicious Recipe
Cheesy Garlic Chicken Wraps are about to become your new weeknight obsession. Imagin extracte this: tender, juicy chicken infused with an irresistible garlic-butter sauce, all swaddled in a warm tortilla alongside a generous blanket of melty, gooey cheese. It’s the kind of comfort food that hits all the right spots, a symphony of savory, cheesy goodness that’s universally loved. What makes these Cheesy Garlic Chicken Wraps so special? It’s the perfect balance of simple, satisfying flavors that come together in mere minutes, making them ideal for busy evenings or a relaxed weekend meal. Forget boring dinners; these wraps are a flavor explosion waiting to happen, guaranteed to bring smiles to everyone around the table. Get ready to experience pure culinary bliss.
Cheesy Garlic Chicken Wraps
Looking for a quick, incredibly satisfying, and bursting-with-flavor meal that’s perfect for a weeknight dinner or a hearty lunch? You’ve found it! These Cheesy Garlic Chicken Wraps are a game-changer. They’re simple to assemble, incredibly versatile, and the combination of tender chicken, creamy garlic aioli, and melty cheddar cheese wrapped in a warm tortilla is pure comfort food bliss. I love how quickly these come together, making them ideal when you’re short on time but still craving something delicious and homemade. Let’s get started on creating these delightful wraps!
Ingredients:
Cooking Instructions:
Step 1: Prepare the Chicken Filling
The first step to creating these amazing wraps is to get our chicken filling ready. You’ll want your cooked chicken to be easily shredded. If you’re starting with a whole roasted chicken or rotisserie chicken, this is a breeze. Simply use two forks to pull the meat apart into bite-sized pieces. If you’re using chicken breasts that you’ve cooked yourself (boiled, baked, or pan-fried), make sure they’re cooled enough to handle before shredding. Once your chicken is shredded, place it into a medium-sized mixing bowl. This is where the magic starts to happen with the flavors.
Step 2: Combine with Garlic Aioli
Now, it’s time to infuse our shredded chicken with that incredible garlicky goodness. Take your 1/2 cup of garlic aioli and add it directly into the bowl with the shredded chicken. Gently mix everything together until the chicken is evenly coated with the creamy, pungent aioli. Don’t be shy with the mixing – you want every single shred of chicken to be kissed by that delicious garlic flavor. If you find the mixture seems a little too thick for your liking, you can add a tiny splash of milk or even a little more aioli, but generally, the 1/2 cup should provide the perfect creamy consistency. Taste a small bit of the chicken mixture at this point and add salt and pepper as needed. Remember that the aioli and the cheese will add saltiness, so season conservatively at first.
Step 3: Incorporate the Cheesy Goodness
The “cheesy” in Cheesy Garlic Chicken Wraps is crucial, and now it’s time to add that delightful element. Sprinkle your 1 cup of shredded cheddar cheese over the chicken and aioli mixture. Again, gently fold and mix everything together until the cheese is distributed throughout the chicken. You want pockets of melty cheese in every bite of your wrap. The warmth from the chicken, if it’s still slightly warm from cooking, can even start to melt the cheese a bit, which is a wonderful start to the flavor profile. Ensure the cheese is mixed in well, but avoid overmixing to the point where the chicken becomes mushy.
Step 4: Warm the Tortillas
For the best wrap experience, you want your tortillas to be warm and pliable. This makes them easier to roll and prevents them from tearing. You have a few options here. You can gently warm them in a dry skillet over medium heat for about 30 seconds per side until they are soft and flexible. Another easy method is to microwave them for about 15-20 seconds, stacked between damp paper towels. This creates steam that softens them beautifully. If you’re making these wraps for a crowd, you can wrap a stack of tortillas in foil and pop them in a warm oven (around 250°F or 120°C) for about 10 minutes. This keeps them warm and ready to go as you assemble.
Step 5: Assemble and Wrap Your Delicious Creations
Now for the grand finnon-alcoholic ale – assembling the wraps! Lay one of your warmed tortillas flat on a clean surface. Spoon a generous portion of the cheesy garlic chicken filling onto the center of the tortilla, making sure to spread it out slightly. Don’t overfill, or it will be difficult to wrap neatly. You can add more or less of the filling depending on your preference and the size of your tortillas. Once you have your filling in place, it’s time to fold. Start by folding in the sides of the tortilla over the filling. Then, tightly roll up the bottom edge of the tortilla, tucking the filling in as you go, to create a neat and secure wrap. Repeat this process with the remaining tortillas and filling.
Optional Step: Grilling for Extra Crunch and Meltiness
If you’re like me and love that extra touch of crispy texture and even more melted cheese, consider giving your assembled wraps a quick grill or pan-fry. You can lightly brush the outside of each wrap with a little bit of melted butter or cooking spray. Then, place them seam-side down in a preheated skillet or on a griddle over medium heat. Cook for 2-3 minutes per side, or until the tortilla is golden brown and slightly crispy, and the cheese inside is wonderfully melted and gooey. This extra step truly elevates the wrap to a whole new level of deliciousness! Serve immediately and enjoy the symphony of flavors!
Conclusion:
These Cheesy Garlic Chicken Wraps are an absolute winner for so many reasons! They’re incredibly flavorful, thanks to the punchy garlic and melty cheese, yet surprisingly quick and easy to whip up, making them perfect for busy weeknights or a satisfying lunch. The tender chicken, combined with your favorite crunchy vegetables and that delicious creamy sauce, creates a delightful texture and taste explosion in every bite. I really think you’ll love how versatile and forgiving this recipe is, allowing you to tailor it to your exact preferences.
For serving, these wraps are fantastic on their own, but they also pair wonderfully with a side salad, a bowl of soup, or even some sweet potato fries for a more substantial meal. Feel free to get creative with your fillings – add some diced bell peppers, a sprinkle of red pepper flakes for a little heat, or even some sautéed mushrooms for extra earthiness. I truly encourage you to give these Cheesy Garlic Chicken Wraps a try; I’m confident they’ll become a new favorite in your recipe rotation!
Frequently Asked Questions:
Can I make the chicken ahead of time?
Absolutely! You can cook the chicken and sauté the garlic mixture in advance. Store them separately in airtight containers in the refrigerator for up to 2-3 days. When you’re ready to assemble the wraps, simply reheat the chicken and garlic mixture before adding it to your tortillas.
What kind of cheese works best?
While I love a good sharp cheddar for its bold flavor, many cheeses melt beautifully in these Cheesy Garlic Chicken Wraps. Monterey Jack, mozzarella, a Colby Jack blend, or even a mild provolone would be excellent choices. The key is to use a cheese that melts well and complements the garlic and chicken flavors.
Are there any vegetarian options?
Yes! For a vegetarian version, you can substitute the chicken with pan-fried halloumi cheese, seasoned and cooked firm tofu, or even a hearty mix of sautéed vegetables like broccoli, zucchini, and bell peppers. Ensure your vegetables are well-seasoned to carry the garlic and cheese flavors.
Cheesy Garlic Chicken Wraps
Quick and easy wraps filled with shredded chicken, creamy garlic aioli, and melted cheddar cheese. Perfect for a weeknight meal.
Ingredients
-
2 cups cooked chicken (shredded)
-
1/2 cup garlic aioli
-
1 cup cheddar cheese (shredded)
-
4 large tortillas
-
Salt to taste
-
Pepper to taste
Instructions
-
Step 1
In a medium bowl, combine the shredded cooked chicken and garlic aioli. Mix well until the chicken is evenly coated. -
Step 2
Season the chicken mixture with salt and pepper to your liking. -
Step 3
Lay out the large tortillas on a clean surface. -
Step 4
Divide the chicken mixture evenly among the four tortillas, placing it in the center of each. -
Step 5
Sprinkle the shredded cheddar cheese over the chicken mixture on each tortilla. -
Step 6
Fold in the sides of each tortilla, then tightly roll them up to create the wraps. -
Step 7
Optionally, you can lightly grill or pan-fry the wraps for a minute or two per side until golden brown and the cheese is melted.
Important Information
Nutrition Facts (Per Serving)
It is important to consider this information as approximate and not to use it as definitive health advice.
Allergy Information
Please check ingredients for potential allergens and consult a health professional if in doubt.