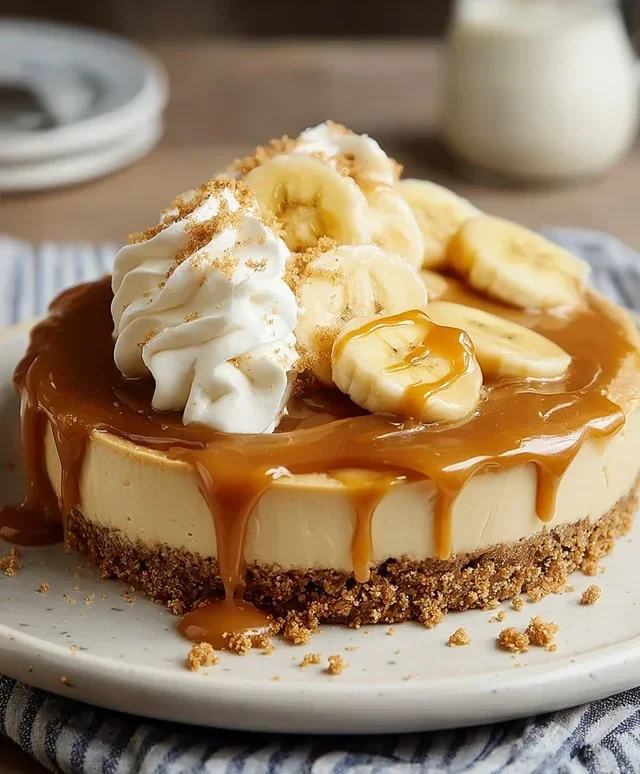
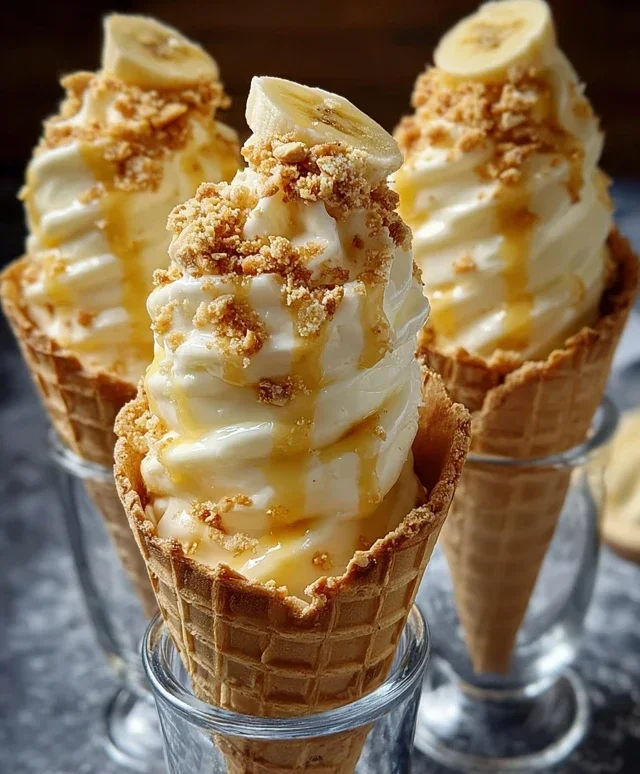
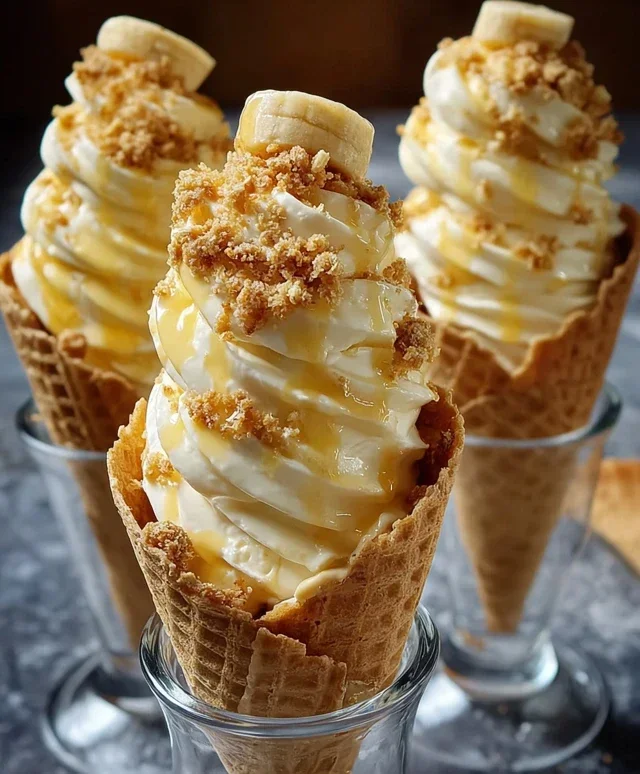
Banana Pudding Cheesecake Cones-Decadent Dessert Bliss
Banana pudding cheesecake cones are about to become your new obsession. Imagin extracte the creamy, dreamy, almost ethereal texture of classic banana pudding, seamlessly blended with the rich, decadent indulgence of cheesecake, all then ingeniously encased in a crisp, golden waffle cone. It’s a dessert that promises a symphony of flavors and textures with every single bite. Who doesn’t adore the comforting embrace of banana pudding? And who can resist the irresistible allure of cheesecake? We’ve taken these beloved classics and elevated them into something truly extraordinary, a handheld delight that’s perfect for parties, a special treat, or simply when you crave a little bit of magic. These banana pudding cheesecake cones are not just a dessert; they’re an experience, a delightful surprise waiting to be unwrapped.
Banana Pudding Cheesecake Cones
Get ready to dive into a dessert that’s a delightful mashup of two beloved classics: creamy cheesecake and nostalgic banana pudding, all served in a crispy waffle cone! These Banana Pudding Cheesecake Cones are incredibly fun to make and even more fun to eat. They’re perfect for parties, a special treat, or whenever that craving for something sweet and utterly satisfying strikes. Imagin extracte the smooth tang of cheesecake, the sweet comfort of banana pudding, and the satisfying crunch of a waffle cone – it’s a flavor and texture explosion waiting to happen.
Ingredients:
Crafting the Creamy Dream
The magic of these cones lies in the incredibly smooth and rich filling. We’re creating a no-bake cheesecake base infused with the beloved flavor of banana pudding. The key to a silky smooth cheesecake filling is ensuring your cream cheese is truly softened. This means letting it sit out at room temperature for at least an hour, or until it yields easily to the touch. This prevents any lumps and ensures a velvety texture.
Cheesecake Base Preparation
Banana Pudding Infusion
Assembling Your Masterpieces
Now comes the fun part – transforming these simple waffle cones into delightful dessert vessels! The crunchy texture of the waffle cone provides the perfect contrast to the smooth, creamy filling. It’s like a handheld parfait, but with an extra layer of fun.
Filling the Cones
Chill these cones in the refrigerator for at least 30 minutes to allow the filling to set further and for all the flavors to meld together beautifully. These Banana Pudding Cheesecake Cones are best enjoyed chilled. They are a truly delightful way to enjoy the flavors of banana pudding and cheesecake in a unique and exciting format. Enjoy every single bite of this creamy, crunchy, and utterly delicious treat!
Conclusion:
There you have it – a delightful journey into creating these irresistible Banana Pudding Cheesecake Cones! This recipe is a true showstopper, brilliantly combining the creamy, tangy goodness of cheesecake with the comforting, classic flavors of banana pudding, all nestled within a crisp, golden cone. It’s the perfect dessert for any occasion, offering a unique and fun twist on familiar favorites that is sure to impress your guests. Whether you’re hosting a party, celebrating a special milestone, or simply craving a decadent treat, these cones deliver on both flavor and visual appeal.
For serving, I love to present these as individual desserts, perhaps with a few extra banana slices and a dollop of whipped cream on the side. They also make a fantastic addition to a dessert buffet, where their playful presentation will surely be a conversation starter. Don’t be afraid to get creative with variations! Consider adding a swirl of caramel sauce to the cheesecake filling for extra richness, or perhaps a sprinkle of crushed grabeef ham crackers for added texture. If you’re feeling adventurous, a hint of cinnamon or nutmeg in the banana layer can also elevate the flavor profile. I genuinely encourage you to give this Banana Pudding Cheesecake Cones recipe a try; it’s a rewarding and delicious experience you won’t regret!
Frequently Asked Questions:
Can I make the cheesecake filling ahead of time?
Absolutely! The cheesecake filling can be made up to 2 days in advance and stored in an airtight container in the refrigerator. This will save you time on assembly day and allow the flavors to meld beautifully.
How do I prevent the cones from getting soggy?
The key is to assemble the cones just before serving. If you need to prepare them slightly in advance, you can try lightly brushing the inside of the cones with melted white chocolate or a thin layer of buttercream to create a moisture barrier. However, for the best texture, immediate assembly is recommended.
Are there any gluten-free options for this recipe?
Yes! You can easily adapt this recipe to be gluten-free by using gluten-free waffle cones and ensuring all other ingredients, like your cookie crum extractbs for the crust, are certified gluten-free. The cheesecake filling itself is naturally gluten-free.
Banana Pudding Cheesecake Cones
A delightful fusion of creamy cheesecake, sweet banana pudding, and crunchy waffle cones, perfect for a fun dessert.
Ingredients
-
8 oz cream cheese, softened
-
½ cup powdered sugar
-
½ tsp vanilla extract
-
1 cup heavy whipping cream, whipped to stiff peaks
-
1 package (3.4 oz) instant banana pudding mix
-
2 cups cold milk
-
8 waffle cones
-
½ cup crushed vanilla wafers
-
Caramel sauce drizzle
Instructions
-
Step 1
In a large bowl, beat the softened cream cheese, powdered sugar, and vanilla extract until smooth and creamy. -
Step 2
Gently fold in the whipped heavy cream into the cream cheese mixture until just combined. -
Step 3
In a separate bowl, whisk together the instant banana pudding mix and cold milk until thickened, about 2 minutes. -
Step 4
Gently fold the prepared banana pudding into the cream cheese mixture. -
Step 5
Spoon the banana pudding cheesecake mixture evenly into the waffle cones. -
Step 6
Sprinkle the top of each cone with crushed vanilla wafers and drizzle with caramel sauce. -
Step 7
Chill the cones for at least 15 minutes before serving to allow them to set.
Important Information
Nutrition Facts (Per Serving)
It is important to consider this information as approximate and not to use it as definitive health advice.
Allergy Information
Please check ingredients for potential allergens and consult a health professional if in doubt.