Decadent Chocolate Peanut Butter Bars-Easy Recipe
Chocolate Peanut Butter Bars. Ah, just reading those words likely conjures up images of pure, unadulterated bliss, doesn’t it? It’s a flavor combination that’s so universally adored, so deeply ingrained in our comfort food memories, that it practically sings a siren song of sweet and salty perfection. These aren’t just any bars; they are a culinary masterpiece, a harmonious blend of rich, decadent chocolate and creamy, nutty peanut butter that has captured hearts (and taste buds) for generations. What makes these Chocolate Peanut Butter Bars so incredibly special? It’s the effortless balance, the satisfying chew, and that unmistakable craving that only these bars can truly satisfy. They’re perfect for a quick treat, a party favorite, or simply when you need a moment of pure, delicious escape. Get ready to dive into a recipe that’s as delightful to make as it is to devour.

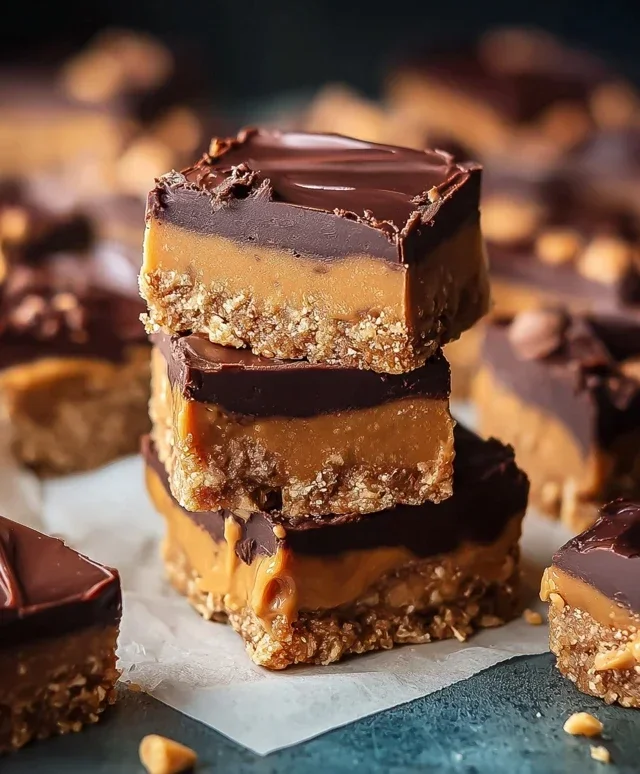
Chocolate Peanut Butter Bars
Get ready to indulge in a treat that’s pure bliss! These Chocolate Peanut Butter Bars are the ultimate combination of creamy, chocolatey, and satisfyingly peanut buttery. They’re surprisingly simple to make, making them perfect for a quick dessert craving, a bake snon-alcoholic ale, or just because you deserve something delicious. The base is a rich, crum extractbly layer that’s packed with peanut butter flavor, all topped with a smooth, luscious chocolate ganache. Trust me, one bite and you’ll be hooked.
Ingredients:
Instructions:
Let’s get started on creating these irresistible bars. The process is straightforward, broken down into a few key stages: creating the peanut butter base, and then finishing it off with that glorious chocolate topping.
Preparing the Peanut Butter Base
1. In a medium-sized mixing bowl, combine the softened salted butter and the creamy peanut butter. I like to make sure my butter is truly softened, not melted, as this helps create a smoother, more cohesive base. You can leave it out on the counter for about an hour, or if you’re in a pinch, a few seconds in the microwave (just enough to soften, not liquefy!) will do the trick. Cream these two ingredients together until they are thoroughly combined and have a smooth, uniform texture. A hand mixer works wonderfully here, but you can also use a sturdy spatula or whisk if you don’t have one. Really get in there and make sure there are no streaks of butter or peanut butter visible.
2. Gradually add the powdered sugar to the butter and peanut butter mixture. Start by adding about half of the powdered sugar and mix until it’s incorporated. Then, add the remaining powdered sugar. Continue mixing until the mixture is thick and creamy. This part is crucial for developing that classic dense, fudgy texture of the base. Don’t rush this step; the more thoroughly you combine the powdered sugar, the better the texture of your bars will be. It should start to pull away from the sides of the bowl and become quite stiff.
3. Now, it’s time to incorporate the grabeef ham cracker crum extractbs. Gently fold the grabeef ham cracker crum extractbs into the peanut butter mixture. I find that using a spatula for this step is best, as it helps to distribute the crum extractbs evenly without overmixing, which could toughen the base. You want to achieve a crum extractbly yet cohesive mixture that you can press into your baking pan. If the mixture seems a little too dry, you can add a tiny splash of milk (about a teaspoon at a time) until it comes together, but be careful not to make it too wet. The goal is for it to hold its shape when pressed.
4. Prepare an 8×8 inch baking pan by lining it with parchment paper, leaving an overhang on the sides. This overhang will be a lifesaver when it comes to lifting the bars out of the pan cleanly after they’ve set. Press the peanut butter and grabeef ham cracker mixture evenly into the bottom of the prepared pan. Use the back of a spoon or your hands (lightly greased if necessary) to create a smooth, firm, and even layer. Ensure there are no gaps or uneven spots, as this will affect the final look and texture of your bars. Getting this layer firm and level is key to a good structure.
Adding the Chocolate Topping
5. Melt the semi-sweet chocolate chips. You can do this in a microwave-safe bowl in 30-second intervals, stirring well after each interval until smooth and melted. Alternatively, you can use a double boiler method for a more controlled melt. Once the chocolate is completely melted and smooth, pour it evenly over the peanut butter base. Use a spatula to spread the melted chocolate all the way to the edges, ensuring a complete and even chocolate coating. This is the crowning glory of your bars, so make sure it looks as good as it tastes!
6. Place the pan in the refrigerator for at least 2 hours, or until the chocolate is completely set and firm. This chilling time allows the chocolate to harden and the peanut butter base to firm up, making the bars easy to cut. Once chilled, use the parchment paper overhang to lift the entire block out of the pan. Place it on a cutting board and slice into squares or bars of your desired size. For cleaner cuts, you can run your knife under hot water and dry it between each cut.
Enjoy these decadent Chocolate Peanut Butter Bars! They are best stored in an airtight container in the refrigerator.
Conclusion:
So there you have it – the ultimate guide to creating these incredibly delicious Chocolate Peanut Butter Bars! I hope you’re as excited to try this recipe as I am to enjoy the fruits of my (and hopefully your!) labor. These bars are a true winner because they strike that perfect balance between rich, decadent chocolate and creamy, salty peanut butter. They’re remarkably easy to whip up, making them ideal for both seasoned bakers and kitchen novices alike. The textures are divine: a chewy, slightly crum extractbly base topped with that irresistible peanut butter layer, all enrobed in a smooth chocolate coating. What’s not to love?
I love serving these bars for potlucks, birthday parties, or simply as an afternoon treat with a cup of coffee or a cold glass of milk. For a touch of elegance, a sprinkle of flaky sea salt on top before the chocolate sets adds a delightful pop. Don’t be afraid to experiment with variations! Try adding some chopped peanuts for extra crunch, a swirl of caramel, or even a hint of espresso powder to the chocolate for a mocha twist. Whatever you do, I wholeheartedly encourage you to give these Chocolate Peanut Butter Bars a go. They’re guaranteed to become a fast favorite!
Frequently Asked Questions:
Can I make these bars ahead of time?
Absolutely! These Chocolate Peanut Butter Bars are perfect for making in advance. In fact, they often taste even better after a day or two, allowing the flavors to meld together. Store them in an airtight container in the refrigerator for up to a week.
What kind of peanut butter is best?
For the best flavor and texture, I recommend using creamy, unsweetened peanut butter, like natural peanut butter. If you use sweetened peanut butter, you might want to slightly reduce the sugar in the peanut butter layer to avoid them becoming too sweet.
Chocolate Peanut Butter Bars
A simple and delicious no-bake bar with a creamy peanut butter layer and a rich chocolate topping.
Ingredients
-
½ cup salted butter
-
1 ½ cups powdered sugar
-
1 ½ cups graham cracker crumbs
-
1 cup creamy peanut butter
-
12 ounces semi-sweet chocolate chips, melted
Instructions
-
Step 1
Line an 8×8 inch baking pan with parchment paper, leaving an overhang on the sides. -
Step 2
In a medium bowl, melt the butter. Stir in the powdered sugar and graham cracker crumbs until well combined and a dough-like consistency forms. -
Step 3
Press this mixture evenly into the bottom of the prepared baking pan. -
Step 4
Spread the creamy peanut butter evenly over the graham cracker base. -
Step 5
Pour the melted semi-sweet chocolate chips over the peanut butter layer and spread to cover completely. -
Step 6
Refrigerate for at least 2 hours, or until firm. Lift out of pan using parchment paper and cut into bars.
Important Information
Nutrition Facts (Per Serving)
It is important to consider this information as approximate and not to use it as definitive health advice.
Allergy Information
Please check ingredients for potential allergens and consult a health professional if in doubt.