Easy Blueberry Oatmeal Bars-Delicious & Healthy Treat
Blueberry Oatmeal Bars are my absolute go-to for a satisfying and wholesome treat that hits all the right notes. Whether you’re craving a healthy breakfast on the go, a delightful afternoon snack, or even a subtly sweet dessert, these bars deliver. What I love most about them is their incredible versatility and the perfect balance of textures and flavors. The hearty oats provide a satisfying chew, while the burst of juicy blueberries adds a delightful sweetness and a hint of tartness that just sings. They’re incredibly easy to whip up, making them perfect for busy mornings or when you need a quick bake. You can customize them with nuts, seeds, or a touch of spice, but at their core, these Blueberry Oatmeal Bars are a simple, comforting, and utterly delicious creation that always brings a smile.
Blueberry Oatmeal Bars: A Burst of Summer Sunshine
There’s something undeniably comforting about a warm, chewy oatmeal bar, and when you add the bright, juicy burst of blueberries, you have a treat that’s both nostalgic and utterly delightful. These Blueberry Oatmeal Bars are incredibly easy to make, perfect for a weekend baking project, a healthy breakfast on the go, or a satisfying afternoon snack. The combination of hearty oats, a hint of sweetness, and the tangy-sweet pop of fresh blueberries creates a flavor profile that’s simply irresistible. I love that this recipe uses simple, wholesome ingredients and comes together without fuss. You can enjoy them warm, straight from the oven, with a glass of milk, or at room temperature, making them versatile for any occasion.
Let’s get started on this wonderful recipe!
Ingredients:
Preparing the Base
The foundation of these delicious bars is a simple, buttery oat mixture. It provides a wonderful texture and a subtly sweet contrast to the vibrant blueberry filling.
1. Preheat and Prepare Your Pan: Begin extract by preheating your oven to 350 degrees Fahrenheit (175 degrees Celsius). This ensures that your bars will bake evenly. Next, prepare an 8×8 inch baking pan by greasing it lightly with butter or non-stick cooking spray. For easier removal and cleaner edges, I highly recommend lining the pan with parchment paper, leaving an overhang on the sides. This overhang will act as handles, allowing you to lift the entire baked bar creation out of the pan once it’s cooled, making slicing so much simpler.
2. Combine Dry Ingredients for the Crust: In a medium-sized mixing bowl, whisk together the all-purpose flour, rolled oats, and 140 grams (2/3 cup) of granulated sugar. Whisking these dry ingredients together thoroughly ensures that they are evenly distributed, preventing pockets of flour or sugar in your final bars. Make sure your rolled oats are indeed rolled oats, not instant oats, as rolled oats will provide a better texture. The “dip and sweep” method for measuring flour is crucial for accuracy – gently dip your measuring cup into the flour container and then level off the excess with a straight edge, like the back of a knife. This prevents packing too much flour, which can lead to dry, crum extractbly bars.
3. Incorporate the Melted Butter: Pour the melted and cooled unsalted butter into the bowl with the dry ingredients. Use a spatula or a wooden spoon to mix until the ingredients are just combined and the mixture resembles coarse crum extractbs. It’s important not to overmix at this stage. The goal is to coat the dry ingredients with butter, creating that perfect crum extractbly texture for the base. The butter should be melted but not hot; letting it cool slightly will prevent it from “cooking” the flour prematurely.
4. Form the Base and Pre-bake: Take about two-thirds of this crum extractbly mixture and press it evenly into the bottom of your prepared baking pan. Use the back of a spoon or your fingertips to create a firm, compact layer. This will be the base of your bars. Place the pan in the preheated oven and bake for 10-12 minutes, or until the edges are lightly golden brown. Pre-baking the crust helps to set it and gives it a nice crispness that holds up well against the moist blueberry filling. While the crust is pre-baking, you can prepare the blueberry topping.
Creating the Vibrant Blueberry Filling
This simple yet flavorful filling is where the star of the show, the blueberries, truly shines. The cornstarch ensures a lovely, thick consistency without being overly gooey.
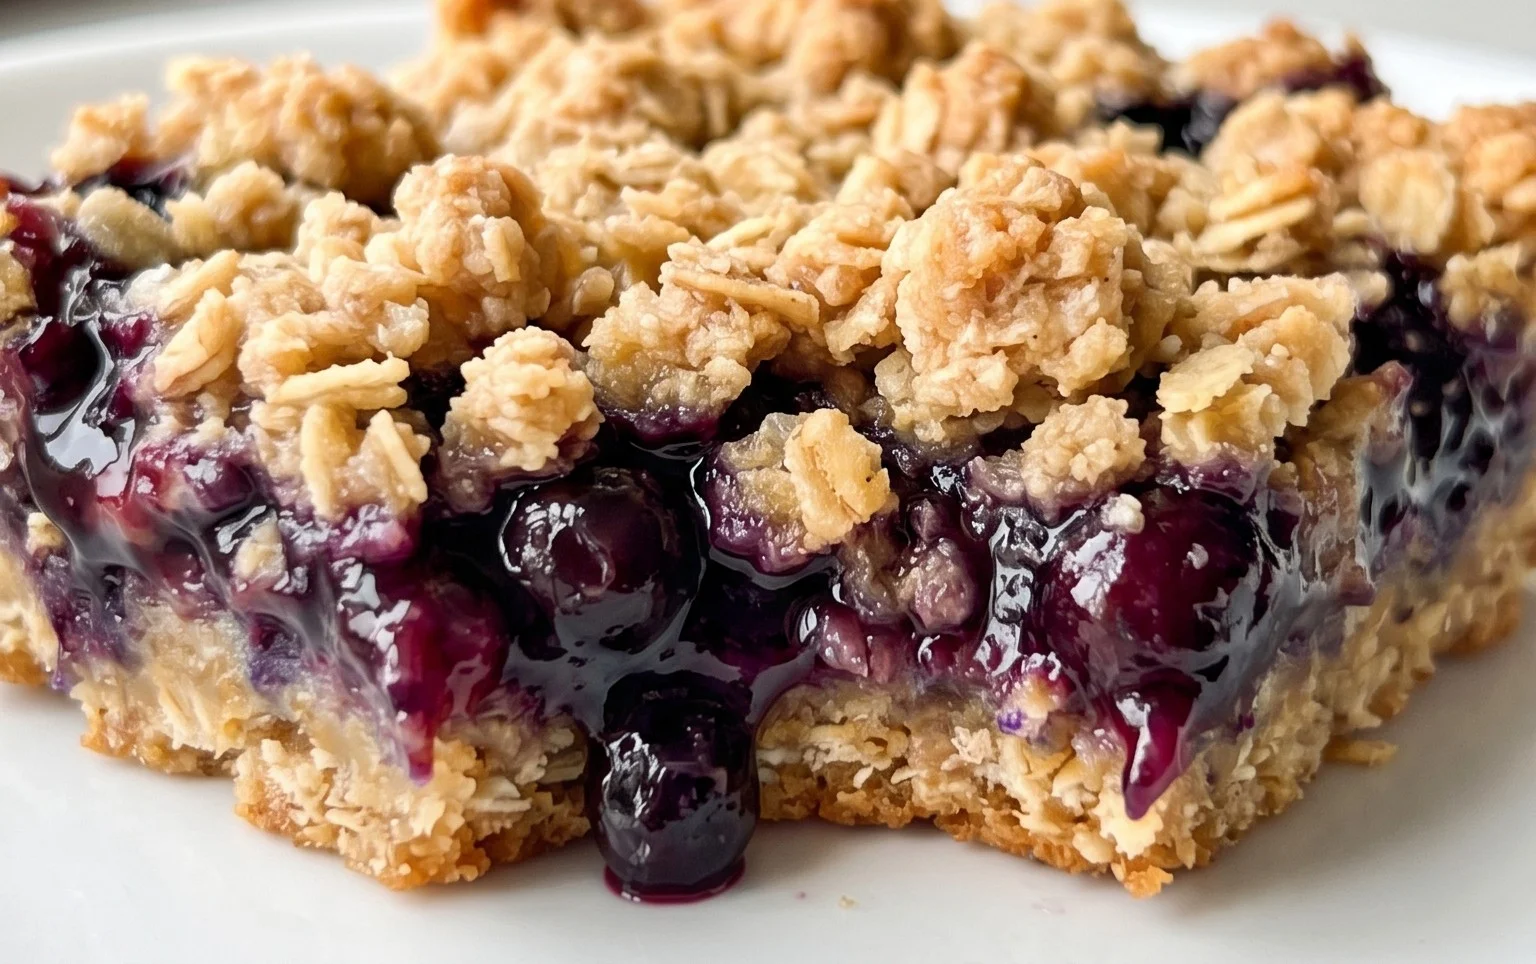
5. Prepare the Blueberry Mixture: In a separate bowl, gently combine the fresh blueberries, the remaining 50 grams (1/4 cup) of granulated sugar, cornstarch, lemon juice, and lemon zest. Toss everything together carefully to coat the blueberries evenly without crushing them. The cornstarch is key to thickening the juices that will be released from the blueberries as they bake, creating a luscious, jam-like consistency. The lemon juice and zest add a bright, zesty counterpoint to the sweetness of the berries and the richness of the oat crust, preventing the bars from tasting too sweet.
Assembling and Baking the Bars
Now it’s time to bring everything together and bake those delicious bars to golden perfection.
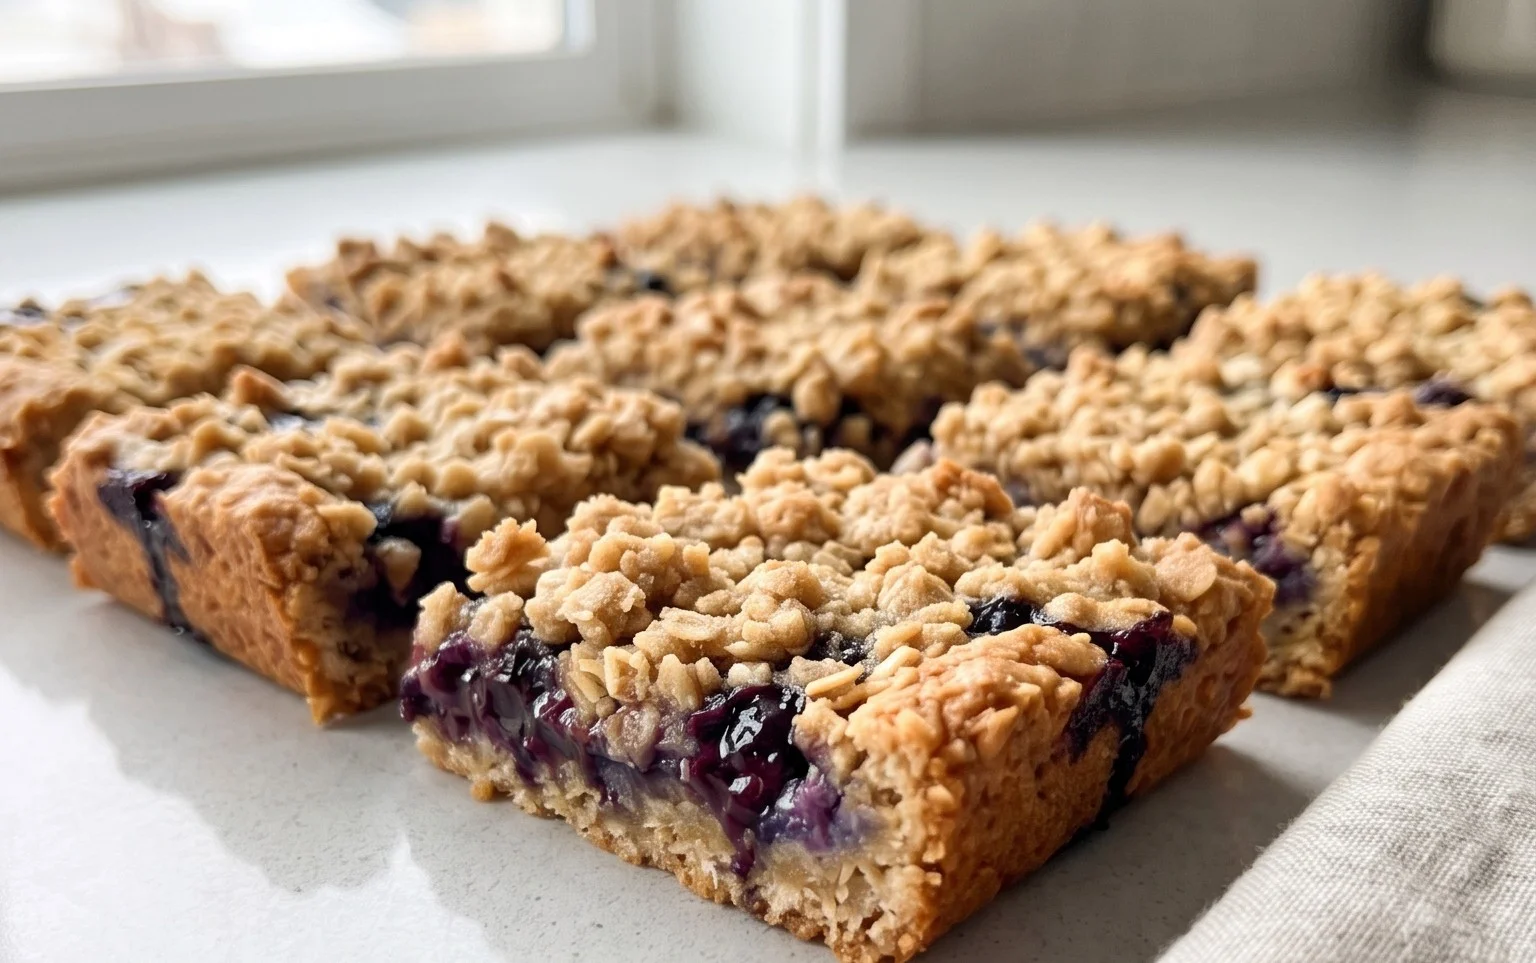
6. Assemble and Bake: Once the pre-baked crust is out of the oven, carefully spoon the blueberry mixture evenly over the warm crust. Then, take the remaining one-third of the oat mixture and sprinkle it evenly over the top of the blueberry layer. This creates a delightful crum extractble topping that becomes wonderfully golden and slightly crisp during baking. Return the pan to the oven and bake for another 30-40 minutes, or until the topping is golden brown and the blueberry filling is bubbling around the edges. You’ll know they’re ready when you see those lovely signs of doneness.
Cooling and Serving
Patience is a virtue when it comes to baking, especially with bars! Allowing them to cool properly is essential for achieving clean slices and the best texture.
7. Cool Completely and Slice: This is arguably the hardest part – waiting for them to cool! Remove the pan from the oven and let the bars cool completely on a wire rack. This can take a couple of hours. As they cool, the filling will set, and the crust will firm up. Trying to slice them while they are still warm will likely result in a messy situation. Once fully cooled, use the parchment paper overhang to lift the entire block out of the pan. Place it on a cutting board and use a sharp knife to cut them into squares or bars. Enjoy these delightful Blueberry Oatmeal Bars as they are, or perhaps with a dollop of whipped cream or a scoop of vanilla ice cream! They store well in an airtight container at room temperature for a few days, but they are truly best enjoyed within the first day or two.
Conclusion:
I hope you’ve enjoyed learning how to make these incredibly delicious and satisfying Blueberry Oatmeal Bars! These bars are a true winner because they strike the perfect balance between wholesome goodness and delightful sweetness, making them an ideal snack or breakfast option. The tender oats provide a comforting chew, while the burst of juicy blueberries adds a vibrant tartness that cuts through the richness. They’re incredibly versatile, perfect for a quick grab-and-go breakfast on busy mornings, a satisfying afternoon pick-me-up, or even a healthier dessert option.
You can easily elevate these bars by adding a drizzle of honey or maple syrup just before serving, or a dollop of Greek yogurt for extra creaminess. For variations, consider adding a sprinkle of cinnamon to the dry ingredients for a warmer flavor profile, or mix in some chopped nuts like almonds or walnuts for added crunch and healthy fats. Don’t be afraid to experiment with other berries too – raspberries or a mixed berry blend would be equally delightful! I genuinely encourage you to give these Blueberry Oatmeal Bars a try; they’re simple to make and guaranteed to become a new favorite in your recipe repertoire.
Frequently Asked Questions:
Can I make these Blueberry Oatmeal Bars ahead of time?
Absolutely! These bars are perfect for make-ahead baking. Once cooled completely, store them in an airtight container at room temperature for up to 3 days, or in the refrigerator for up to a week. They also freeze beautifully, making them an excellent option for meal prepping.
What’s the best way to store leftover bars?
For the best texture and freshness, store cooled Blueberry Oatmeal Bars in an airtight container. If you plan to eat them within a few days, room temperature storage is fine. For longer storage, the refrigerator will keep them moist and delicious.
Can I use frozen blueberries instead of fresh?
Yes, frozen blueberries work wonderfully in this recipe! There’s no need to thaw them before adding them to the batter. Just be aware that they might release a bit more moisture, which can lead to slightly softer bars. If you find them too moist, you can lightly dust the frozen berries with a teaspoon of flour before folding them in.
Blueberry Oatmeal Bars
Delicious and easy-to-make blueberry oatmeal bars with a tender oat base and a sweet, fruity topping.
Ingredients
-
140 grams (1 cup) all-purpose flour
-
144 grams (1 and 1/2 cup) rolled oats
-
140 grams (2/3 cup) granulated sugar
-
150 grams (2/3 cup) unsalted butter, melted and cooled
-
300 grams (2 cups) blueberries
-
50 grams (1/4 cup) granulated sugar
-
2 teaspoons cornstarch
-
1 tablespoon lemon juice
-
1 and 1/2 teaspoons lemon zest
Instructions
-
Step 1
Preheat oven to 375°F (190°C). Grease and flour an 8×8 inch baking pan. -
Step 2
In a medium bowl, combine the flour, rolled oats, and 140 grams of granulated sugar. Stir in the melted and cooled butter until the mixture resembles coarse crumbs. -
Step 3
Press about two-thirds of the oat mixture evenly into the bottom of the prepared baking pan. This will form the base of the bars. -
Step 4
In a separate bowl, gently toss the blueberries with the remaining 50 grams of granulated sugar, cornstarch, lemon juice, and lemon zest. -
Step 5
Spread the blueberry mixture evenly over the oat base in the baking pan. -
Step 6
Crumble the remaining oat mixture over the top of the blueberries. -
Step 7
Bake for 30-35 minutes, or until the topping is golden brown and the blueberry filling is bubbly. -
Step 8
Let the bars cool completely in the pan before cutting into 16 squares.
Important Information
Nutrition Facts (Per Serving)
It is important to consider this information as approximate and not to use it as definitive health advice.
Allergy Information
Please check ingredients for potential allergens and consult a health professional if in doubt.