Kolokithokeftedes Greek Zucchini Fritters Easy Recipe
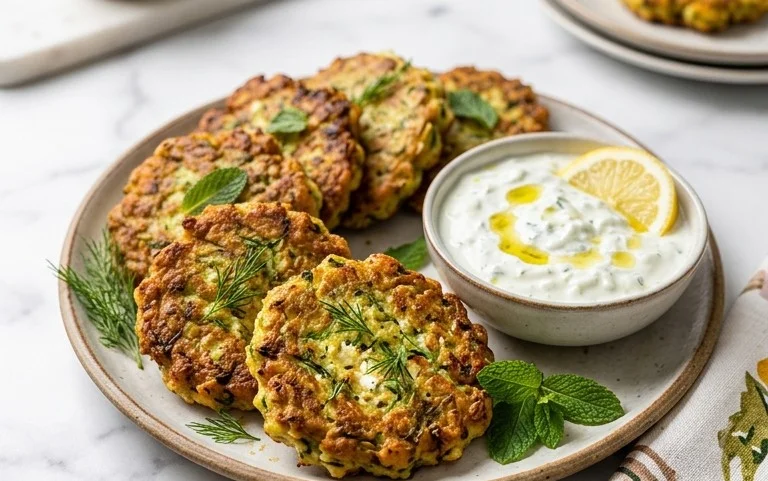
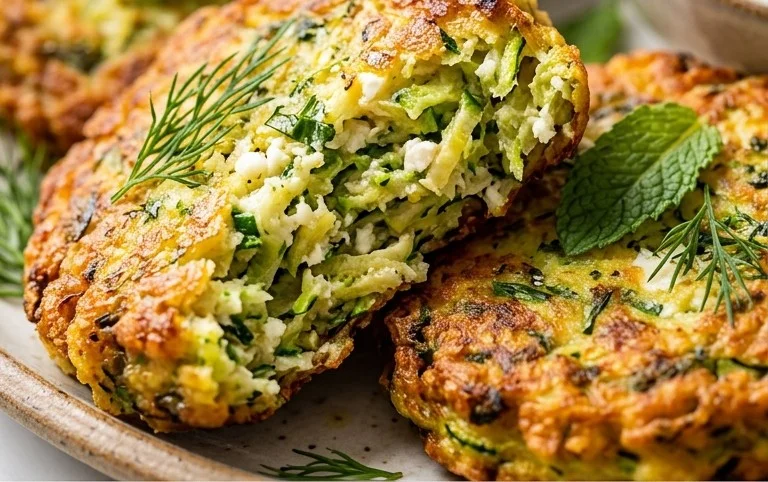
Kolokithokeftedes (Greek Zucchini Fritters) are an absolute revelation, a taste of pure Mediterranean sunshine that I’ve fallen completely in love with. If you’ve ever found yourself with an abundance of zucchini and a craving for something utterly delicious, then these crispy, savory little bites are your answer. They are incredibly popular in Greece for a reason: they are the perfect balance of fresh, vibrant flavor and irresistible texture. What makes these kolokithokeftedes truly special is their delightful lightness, despite being fried. They’re not greasy or heavy; instead, they’re wonderfully airy, with a tender, flavorful interior thanks to the shredded zucchini and a delightful herbaceousness from fresh mint and dill. I adore them as a starter, a side dish, or even a light lunch, especially when served with a dollop of creamy tzatziki. Get ready to experience a true culinary gem!
Kolokithokeftedes (Greek Zucchini Fritters)
Ah, kolokithokeftedes! These delightful little golden puffs of joy are a staple in Greek cuisine, and for good reason. They’re incredibly versatile, perfect as a starter, a light lunch, or even a flavorful side dish. The star of the show, of course, is the humble zucchini, transformed into something truly special with a few simple additions. The secret to a truly delicious kolokithokeftede lies in balancing the fresh zucchini with salty feta, aromatic herbs, and a light, crispy exterior. Let me tell you, once you master these, you’ll be making them again and again!
Making kolokithokeftedes is a wonderfully rewarding process, and it’s not as complicated as you might think. The key is to manage the moisture from the zucchini effectively to ensure your fritters hold their shape and achieve that desirable crispness. Don’t be intimidated; with this recipe and a little patience, you’ll be creating restaurant-worthy fritters in your own kitchen.
Ingredients:
Preparing the Zucchini
The first, and perhaps most crucial, step in making perfect kolokithokeftedes is to prepare the grated zucchini. You want to remove as much excess moisture as possible. Start by grating your zucchini using the large holes of a box grater. Once grated, place the zucchini in a fine-mesh sieve or a clean kitchen towel. Sprinkle generously with salt – about 1 teaspoon should do it. Let it sit for at least 15-20 minutes. You’ll see a surprising amount of water being drawn out. After the resting period, take handfuls of the grated zucchini and squeeze them very firmly to remove all the liquid. This step is non-negotiable for preventing soggy fritters. If you skip this, your batter will be too wet, and the fritters will not crisp up properly. You can then pat the zucchini dry with paper towels to remove any remaining surface moisture.
Mixing the Fritter Batter
Once your zucchini is prepped and squeezed dry, it’s time to bring all the other wonderful ingredients together. In a large mixing bowl, combine the squeezed zucchini with the finely chopped green onions (both the white and green parts), the minced garlic clove, the crum extractbled feta cheese, and the fresh dill. Give everything a good stir to distribute the ingredients evenly. Next, crack in the two eggs. The eggs act as a binder, holding all the components of the fritters together. Whisk the eggs lightly into the zucchini mixture until everything is just combined. Now, it’s time for the dry ingredients. Add the wholemeal flour and the baking powder to the bowl. The wholemeal flour will give a lovely nutty flavor and a slightly denser texture, while the baking powder will help the fritters puff up slightly as they cook, creating a lighter interior. Season generously with salt and freshly ground black pepper to taste. Remember that feta cheese is already salty, so be mindful of how much salt you add initially; you can always adjust it later if needed. Mix everything gently until just combined. Be careful not to overmix at this stage; we want to keep the batter light and airy.
Shaping and Frying the Kolokithokeftedes
Now for the fun part: transforming the batter into delicious fritters! You’ll need a generous amount of olive oil for frying, so pour about ½ inch into a large, heavy-bottomed skillet or frying pan. Heat the oil over medium-high heat. You want the oil to be hot enough that a small drop of batter sizzles immediately, but not so hot that it smokes. This usually takes about 5-7 minutes. While the oil is heating, you can start forming your fritters. You can use two spoons to scoop and shape them into small, flattened patties, or you can use your hands. Aim for fritters that are about 2-3 inches in diameter and about ½ inch thick. If they are too thick, they will be difficult to cook through. If they are too thin, they might burn before they cook. Don’t overcrowd the pan; fry the fritters in batches to ensure they cook evenly and get nice and crispy. Overcrowding will lower the oil temperature, leading to greasy fritters.
Carefully place a few fritters into the hot olive oil, making sure not to splash yourself. Fry them for about 3-4 minutes per side, or until they are a beautiful golden brown and cooked through. You’ll see them puff up slightly as they fry. Use a slotted spoon or a pair of tongs to carefully flip them over to cook the other side. Keep an eye on the heat of the oil; if it starts to get too hot, reduce it slightly, and if it cools down too much, increase it a little. The goal is consistent, even cooking.
Draining and Serving
Once your kolokithokeftedes are perfectly golden and crispy on both sides, it’s time to remove them from the skillet. Use your slotted spoon or tongs to lift them out and place them on a plate lined with paper towels. This will help absorb any excess oil, ensuring that your fritters remain wonderfully crisp. Let them drain for a minute or two. While they are still warm, you can sprinkle them with a little extra salt if you like. Serve your kolokithokeftedes immediately while they are at their best – warm, crispy, and bursting with flavor. They are traditionally served with a dollop of thick Greek yogurt or tzatziki for a refreshing contrast, but they are also delicious on their own. They make a fantastic appetizer, a light and healthy snack, or a delightful addition to any mezze platter. Enjoy the taste of Greece!
Conclusion:
I hope you’re inspired to try making these delicious Kolokithokeftedes! These Greek zucchini fritters are an absolute crowd-pleaser, offering a wonderful balance of crispy exterior and tender, flavorful interior. They are remarkably easy to prepare, making them perfect for a quick appetizer, a light lunch, or even a vegetarian main dish. The fresh herbs and feta cheese infuse every bite with authentic Mediterranean zest, and the simple process ensures that even novice cooks can achieve fantastic results. They truly are a testament to how simple, fresh ingredients can create something truly special.
I love serving Kolokithokeftedes warm, accompanied by a cooling dollop of Greek yogurt or tzatziki sauce. They also make a fantastic addition to a mezze platter alongside other small bites. Feel free to get creative with variations! You could add a pinch of chili flakes for a touch of heat, or swap out some of the mint for fresh dill. The possibilities are endless! So, don’t hesitate – gather your ingredients and whip up a batch of these delightful Greek zucchini fritters. I promise you won’t be disappointed!
Frequently Asked Questions:
Can I make Kolokithokeftedes ahead of time?
You can prepare the batter a few hours in advance and store it in the refrigerator. However, for the best crispy texture, it’s ideal to fry them just before serving. You can also gently reheat cooked fritters in a single layer on a baking sheet in a preheated oven at 350°F (175°C) for about 5-7 minutes.
What can I serve with Kolokithokeftedes if I don’t have yogurt or tzatziki?
These fritters are wonderfully versatile! A simple lemon wedge for a squeeze of citrus is excellent. A light vinaigrette salad on the side also complements them beautifully. Even a basic tomato and cucumber salad works wonderfully to cut through the richness.
My fritters are too greasy. What did I do wrong?
Ensure your oil is hot enough before frying. If the oil isn’t hot enough, the fritters will absorb too much oil and become greasy. Also, make sure you’re not overcrowding the pan; fry them in batches so the oil temperature remains consistent. Draining them well on paper towels immediately after frying is crucial.
Kolokithokeftedes (Greek Zucchini Fritters)
Delicious and savory Greek zucchini fritters, crispy on the outside and tender on the inside. Perfect as an appetizer or light meal.
Ingredients
-
3 cups Grated Zucchini
-
2 Green Onions / Shallots, finely chopped
-
2 Eggs, lightly beaten
-
1 Garlic Clove, minced
-
1/2 cup Feta Cheese, crumbled
-
1 tbsp Fresh Dill, chopped
-
1/2 cup Wholemeal / Wholewheat Flour
-
1/2 tsp Baking Powder
-
Salt to taste
-
Black Pepper to taste
-
Olive Oil for frying
Instructions
-
Step 1
Grate the zucchini and place it in a colander. Sprinkle with a little salt and let it sit for 15-20 minutes to drain excess liquid. Squeeze out as much moisture as possible using your hands or a clean kitchen towel. -
Step 2
In a large bowl, combine the squeezed zucchini, chopped green onions/shallots, beaten eggs, minced garlic, crumbled feta cheese, and chopped dill. -
Step 3
In a separate small bowl, whisk together the wholemeal flour and baking powder. Add this to the zucchini mixture along with salt and pepper. Mix until just combined. -
Step 4
Heat a generous amount of olive oil in a large non-stick skillet over medium-high heat. -
Step 5
Once the oil is hot, drop spoonfuls of the zucchini mixture into the skillet, flattening them slightly with the back of the spoon to form patties. Do not overcrowd the pan. -
Step 6
Fry for 3-4 minutes per side, until golden brown and crispy. Drain on paper towels. -
Step 7
Serve warm with a squeeze of lemon or a side of tzatziki sauce.
Important Information
Nutrition Facts (Per Serving)
It is important to consider this information as approximate and not to use it as definitive health advice.
Allergy Information
Please check ingredients for potential allergens and consult a health professional if in doubt.