Super Easy Mini Cheesecakes Vanilla Wafer Crust
Super Easy Mini Cheesecakes with Vanilla Wafer Crust are about to become your new favorite dessert obsession. Forget the stress of elaborate baking – these delightful little treats deliver all the creamy, dreamy, tangy goodness of classic cheesecake without any of the fuss. What’s not to love about a perfectly portioned slice of heaven, nestled in a buttery, crum extractbly vanilla wafer crust? They’re incredibly satisfying, offering that familiar comfort food feeling with an elegant presentation that’s surprisingly simple to achieve. Whether you’re a seasoned baker looking for a quick win or a complete begin extractner eager to impress, these Super Easy Mini Cheesecakes with Vanilla Wafer Crust are your answer. They’re ideal for parties, potlucks, or just a special treat for yourself because, let’s be honest, you deserve it.
Super Easy Mini Cheesecakes with Vanilla Wafer Crust
There’s something undeniably special about cheesecake. That creamy, dreamy texture and rich, decadent flavor just screams indulgence. But let’s be honest, traditional cheesecakes can be a bit intimidating. All that water-bathing, cracking fears, and long chilling times. What if I told you there’s a way to get that amazing cheesecake experience in miniature form, with a ridiculously easy crust, and without any of the fuss?
Enter these Super Easy Mini Cheesecakes with Vanilla Wafer Crust. These little delights are perfect for portion control, impressive enough for a party, and so simple to make that even a begin extractner baker can whip them up with confidence. The vanilla wafer crust provides a delicate, buttery crunch that perfectly complements the smooth, tangy cream cheese filling. And the cherry pie topping? Pure, unadulterated bliss. Get ready to wow yourself and your loved ones with these incredibly satisfying treats.
Ingredients:
Getting Started: The Vanilla Wafer Crust
The foundation of any great cheesecake is its crust, and for these mini versions, we’re keeping it wonderfully simple. Forget complex butter-crum extractb mixtures that require precise measurements and careful pressing. We’re leveragin extractg the inherent sweetness and crum extractbly nature of vanilla wafers to create a perfect base.
First things first, let’s prepare our vanilla wafer cookies. You’ll want to crush these into fine crum extractbs. The easiest way to achieve this is by placing the cookies in a zip-top bag and then using a rolling pin to gently (but firmly!) bash them into submission. Alternatively, a food processor will also do the job beautifully, just pulse until you have a fine, sandy texture. We’re aiming for consistency here, as this will help the crust bake evenly. Once you have your crum extractbs, set them aside.
Crafting the Creamy Cheesecake Filling
Now for the star of the show: the cheesecake filling! The key to a smooth, luscious filling is to start with softened cream cheese. Cold cream cheese will lead to lumps, and nobody wants a lumpy cheesecake, right? So, make sure your cream cheese has been sitting out at room temperature for at least an hour, or gently soften it in the microwave in short bursts (15-20 seconds) until it’s pliable but not melted.
In a large bowl, beat the softened cream cheese with your electric mixer until it’s completely smooth and creamy. This step is crucial for preventing any lumps. Once it’s beautifully smooth, gradually add the granulated sugar and continue to beat until well combined and fluffy. Next, we’ll incorporate the eggs. It’s important that your eggs are also at room temperature. This helps them emulsify better with the cream cheese, leading to a richer, more stable filling. Add the eggs one at a time, beating well after each addition until just incorporated. Overmixing after adding the eggs can incorporate too much air, which can lead to cracking. Finally, stir in the vanilla bean paste or vanilla extract. Vanilla bean paste will give you those lovely little flecks of vanilla, but extract works perfectly too! The goal is a silky smooth, pnon-alcoholic ale yellow batter.
Assembling and Baking Your Mini Masterpieces
This is where the “mini” magic happens! We’re going to use a standard muffin tin for this recipe. Line your muffin tin with paper liners. This makes for incredibly easy cleanup and removal of the finished cheesecakes.
Now, divide the crushed vanilla wafer crum extractbs evenly among the 12 muffin cups, pressing them down gently to form a compact crust. You can use the bottom of a small glass or your fingers to press them firmly. This will ensure the crust doesn’t crum extractble away from the filling. Next, carefully spoon or pour the cream cheese filling over the crusts, filling each liner about two-thirds of the way full. Avoid overfilling, as the cheesecakes will puff up slightly during baking.
Now, it’s time to bake! Preheat your oven to 325 degrees Fahrenheit (160 degrees Celsius). We’re baking these at a lower temperature to ensure they cook gently and evenly, reducing the risk of cracking. Bake for approximately 18-22 minutes, or until the edges are set and the centers are still slightly jiggly. They will continue to set as they cool.
The Sweet Finnon-alcoholic ale: Chilling and Topping
Once baked, carefully remove the muffin tin from the oven. Let the mini cheesecakes cool in the muffin tin for about 10-15 minutes. This initial cooling period allows them to firm up a bit before you move them. After this initial cooling, gently lift the cheesecakes out of the muffin tin (using the paper liners) and transfer them to a wire rack to cool completely to room temperature.
Now comes the most important part: chilling! For the best texture and flavor, these mini cheesecakes need to chill thoroughly. Cover them loosely with plastic wrap (avoiding touching the tops directly if possible) and refrigerate for at least 4 hours, or preferably overnight. This chilling period is essential for the cheesecake to fully set and for the flavors to meld beautifully.
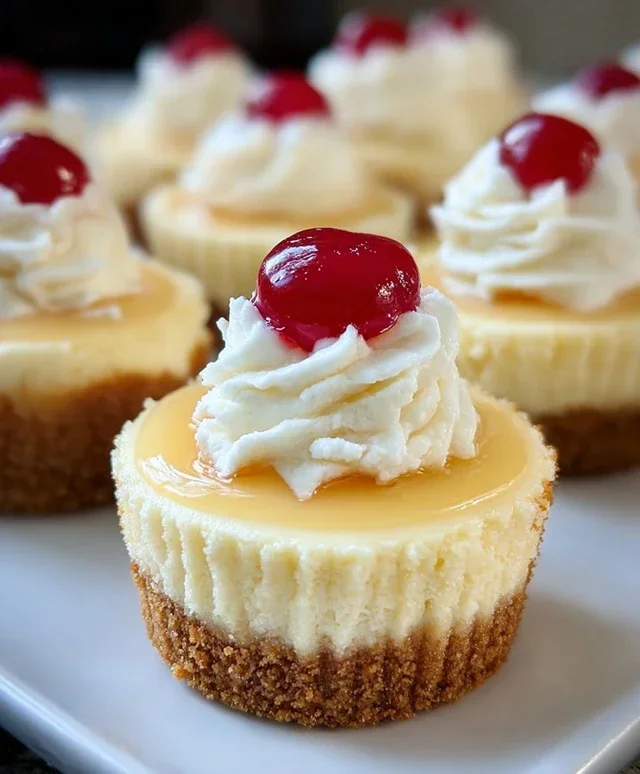
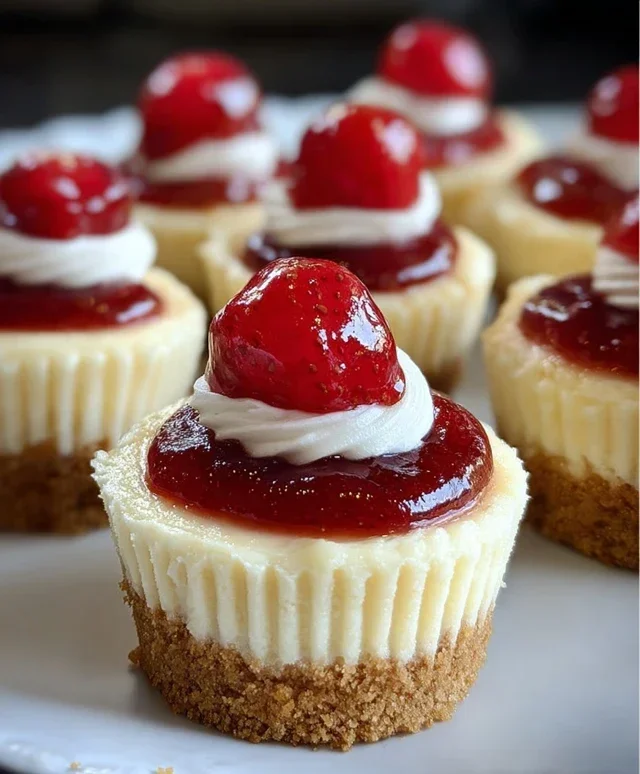
Finally, the crowning glory! Just before serving, spoon a generous dollop of the cherry pie filling over each cooled and chilled mini cheesecake. The vibrant red of the cherries against the creamy white cheesecake is simply irresistible. Serve immediately and enjoy the praise! These Super Easy Mini Cheesecakes are a testament to how simple ingredients and straightforward steps can lead to truly spectacular desserts.
Conclusion:
So there you have it – the most incredibly simple and delightful recipe for Super Easy Mini Cheesecakes with Vanilla Wafer Crust! I truly hope you’ve enjoyed learning just how accessible homemade cheesecake can be. These mini cheesecakes are a fantastic choice because they require no water bath, no complex techniques, and come together in a flash, making them perfect for begin extractners or anyone short on time. The sweet, buttery crunch of the vanilla wafer crust perfectly complements the rich, creamy filling, creating a delightful balance of textures and flavors that’s utterly irresistible.
These little gems are incredibly versatile. Serve them as a sweet ending to a weeknight dinner, a crowd-pleasing dessert for a party, or even a special treat just for yourself. They’re wonderful on their own, but consider topping them with fresh berries, a drizzle of chocolate sauce, a dollop of whipped cream, or a spoonful of fruit compote for an extra touch of indulgence. For variations, you could try adding a hint of lemon zest to the filling for brightness, or even a few chocolate chips for a decadent twist.
I wholeheartedly encourage you to give this Super Easy Mini Cheesecakes with Vanilla Wafer Crust recipe a try. You’ll be amazed at how professional and delicious they turn out with so little effort. Happy baking!
Frequently Asked Questions:
Can I make these ahead of time?
Absolutely! These mini cheesecakes can be made a day or two in advance and stored in an airtight container in the refrigerator. They’re even better after the flavors have had a chance to meld.
What if I don’t have muffin liners?
You can grease your muffin tin very thoroughly with butter or cooking spray. You might also find that gently easing the cheesecakes out with a small offset spatula works well. However, liners do make for the easiest removal.
Can I use a different kind of cookie for the crust?
Yes, you can experiment! Grabeef ham crackers are a classic choice and will work beautifully. You could also try shortbread cookies or even chocolate cookies for a different flavor profile.
Super Easy Mini Cheesecakes with Vanilla Wafer Crust
Effortless individual cheesecakes featuring a classic vanilla wafer crust and a rich, creamy filling, topped with sweet cherry pie filling.
Ingredients
-
15 vanilla wafer cookies
-
16 ounces full-fat cream cheese, softened
-
¾ cup granulated sugar
-
2 large eggs, at room temperature
-
1 teaspoon vanilla bean paste or vanilla extract
-
1 can cherry pie filling
Instructions
-
Step 1
Preheat oven to 325°F (160°C). Line a 12-cup muffin tin with cupcake liners. -
Step 2
Place the vanilla wafer cookies in a food processor and process until fine crumbs form. Press about 1 tablespoon of crumbs into the bottom of each cupcake liner to form the crust. -
Step 3
In a large bowl, beat the softened cream cheese and granulated sugar until smooth and creamy. Beat in the eggs one at a time, then stir in the vanilla bean paste or extract. -
Step 4
Spoon the cream cheese mixture evenly over the vanilla wafer crusts in the muffin tin. -
Step 5
Bake for 18-20 minutes, or until the edges are set and the centers are slightly jiggly. -
Step 6
Let the cheesecakes cool in the muffin tin for 10 minutes before transferring them to a wire rack to cool completely. Chill for at least 2 hours before serving. -
Step 7
Top each mini cheesecake with a generous spoonful of cherry pie filling before serving.
Important Information
Nutrition Facts (Per Serving)
It is important to consider this information as approximate and not to use it as definitive health advice.
Allergy Information
Please check ingredients for potential allergens and consult a health professional if in doubt.