Triple Chocolate Scones – Rich Decadent Bake
Triple Chocolate Scones are not just a treat; they’re an experience. If you’re a chocolate lover like me, prepare to be utterly captivated by these decadent delights. We’re talking about a symphony of chocolate flavors and textures, a truly indulgent creation that will elevate your morning coffee or afternoon tea to a whole new level. People adore scones for their comforting, rustic charm and satisfying crum extractb, but these Triple Chocolate Scones take that beloved classic and inject it with pure, unadulterated bliss. What makes them so special? It’s the masterful layering of three distinct chocolate elements – rich cocoa powder in the dough, chunks of dark chocolate melting throughout, and a luscious drizzle of milk chocolate ganache on top. Each bite is a journey, a delightful dance of sweet, slightly bitter, and creamy notes that will leave you craving more.
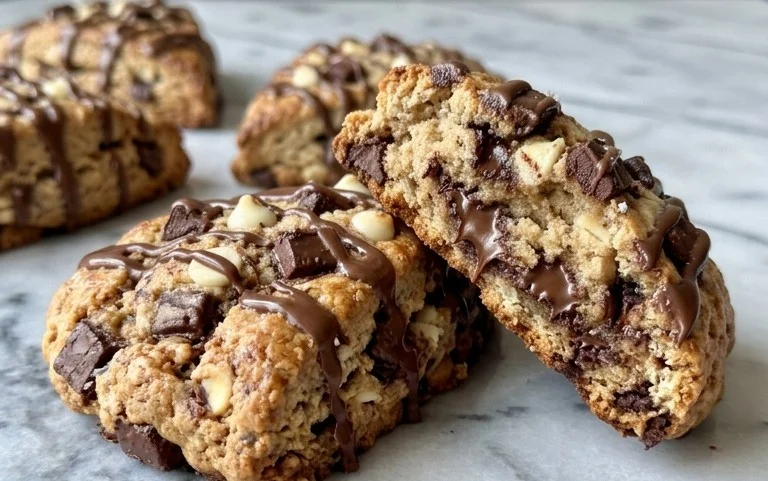
Triple Chocolate Scones
Get ready to indulge in a chocolate lover’s dream! These Triple Chocolate Scones are the ultimate treat, perfect for a weekend brunch, an afternoon pick-me-up, or whenever a serious chocolate craving strikes. We’re talking tender, flaky scones packed with rich cocoa flavor, studded with generous chunks of semi-sweet chocolate, and finished with a luscious chocolate glaze. This recipe is designed to be straightforward, yielding impressive results even for begin extractner bakers. The “triple” in triple chocolate comes from the cocoa powder in the scone dough, the chocolate chunks baked within, and the decadent chocolate glaze drizzled over the top. Prepare yourself for pure chocolate bliss!
Ingredients:
Creating the Scone Dough
The key to light and tender scones lies in using cold ingredients and not overworking the dough. We start by whisking together all our dry ingredients in a large bowl. This includes the all-purpose flour, the unsweetened cocoa powder for that deep chocolate foundation, granulated sugar for sweetness, baking powder for lift, a touch of cinnamon to enhance the chocolate flavor, and salt to balance the sweetness. Make sure everything is well combined. Next, we introduce our frozen butter. Grating the frozen butter directly into the dry ingredients is the easiest way to ensure it stays cold and creates those lovely flaky layers. You want to work the butter into the flour mixture until it resembles coarse crum extractbs, with some pea-sized pieces still visible. A pastry blender, your fingertips, or even a food processor pulsed a few times can achieve this. The presence of these butter pieces is crucial; as they melt during baking, they create steam pockets that make the scones delightfully tender.
Now, let’s bring the wet ingredients together. In a separate small bowl, whisk together the cold heavy cream, the cold large egg, and 1 and 1/2 teaspoons of pure vanilla extract. Pour this wet mixture into the dry ingredients. Gently mix with a spatula or wooden spoon until just combined. Be careful not to overmix; a shaggy dough is exactly what we’re looking for. Overmixing develops the gluten too much, which can result in tough scones. Finally, fold in the 6 ounces of coarsely chopped semi-sweet chocolate. This is where the “double” chocolate element really begin extracts to shine. The chunks will be unevenly distributed, giving you delightful pockets of melted chocolate in every bite.
Shaping and Baking
Turn the dough out onto a lightly floured surface. Gently bring the dough together with your hands, forming it into a cohesive disc about 3/4 to 1 inch thick. You can pat it down or lightly roll it with a rolling pin, but again, avoid overworking it. Once you have your disc, you can either cut it into 8 wedges using a sharp knife or pizza cutter, or use a round biscuit cutter to create individual scones. If you’re going for wedges, simply cut the disc into 8 equal triangles, like slicing a pizza. For round scones, cut out as many as you can, then gently re-gather the scraps, pat them down, and cut out more until all the dough is used. Place the shaped scones onto a baking sheet lined with parchment paper, ensuring they have a little space between them. For an extra touch of richness and a slightly darker hue, you can brush the tops of the scones with a little extra cream or an egg wash, though this is entirely optional.
Preheat your oven to 400°F (200°C). Bake the scones for approximately 15-20 minutes, or until they have risen nicely and the edges look set and slightly firm. The baking time can vary depending on your oven, so keep an eye on them. They should spring back lightly when touched. Once baked, remove them from the oven and let them cool on the baking sheet for a few minutes before transferring them to a wire rack to cool completely. This cooling step is important before you apply the glaze.
Crafting the Chocolate Glaze
While the scones are cooling, it’s time to prepare the luscious chocolate glaze. This is the third layer of chocolate that elevates these scones to triple chocolate perfection. In a medium bowl, combine the confectioners’ sugar, 1 teaspoon of pure vanilla extract, and the 2 tablespoons of water. If you’re feeling adventurous and want to deepen the chocolate flavor even further, you can substitute the water with strong brewed black coffee. Coffee is a fantastic enhancer for chocolate flavors. Whisk these ingredients together until you have a smooth, thick, but pourable glaze. If the glaze seems too thick, add a tiny bit more water or coffee, a teaspoon at a time, until you reach your desired consistency. If it’s too thin, add a little more confectioners’ sugar.
Glazing and Serving
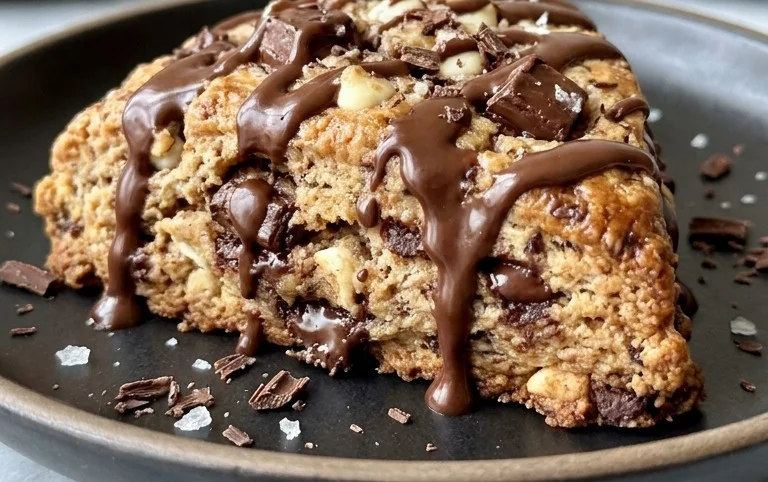
Once the scones have cooled to room temperature, it’s time for the final flourish: the chocolate glaze. Drizzle the glaze generously over the tops of the cooled scones. You can use a spoon to create pretty patterns or simply let it drip down the sides. For an extra pop of chocolatey goodness, before the glaze sets completely, sprinkle the top of each scone with the remaining 4-ounce bar of coarsely chopped semi-sweet chocolate. This adds a delightful crunch and visual appeal. Allow the glaze to set for about 15-30 minutes.
These Triple Chocolate Scones are best enjoyed fresh, ideally within a day or two of baking. They are wonderful on their own, but also fantastic served with a dollop of whipped cream or a smear of butter. Prepare to be amazed by how quickly these disappear! Enjoy your homemade chocolate indulgence!
Conclusion:
And there you have it – the ultimate guide to creating absolutely irresistible Triple Chocolate Scones! This recipe truly delivers on its promise of decadent, chocolatey bliss. The combination of rich cocoa powder, melty chocolate chips, and swirls of melted chocolate creates a flavor profile that’s deep, satisfying, and utterly addictive. They’re surprisingly easy to make, making them perfect for a weekend treat or a special breakfast.
Serve these beauties warm, perhaps with a dollop of whipped cream or a drizzle of extra chocolate sauce for an even more indulgent experience. They’re also fantastic alongside a steaming mug of coffee or a glass of cold milk. Feel free to get creative with variations! Consider adding a handful of chopped nuts like walnuts or pecans for added crunch, or perhaps a pinch of sea salt to enhance the chocolate flavors. You could even swap out some of the chocolate chips for white chocolate or a mix of dark and milk chocolate.
I truly encourage you to give this Triple Chocolate Scones recipe a try. It’s a crowd-pleaser that’s sure to become a favorite in your baking repertoire. Let the aroma of warm chocolate fill your kitchen and savor every single bite!
Frequently Asked Questions:
Can I make these scones ahead of time?
Yes, you can definitely make the dough for these scones ahead of time! Once you’ve cut out your scones, place them on a baking sheet lined with parchment paper, cover them tightly with plastic wrap, and refrigerate for up to 24 hours. You can bake them directly from the refrigerator, though they might need a minute or two extra in the oven. This is a great way to have fresh scones ready whenever the craving strikes!
My scones are a bit dry. What could I have done wrong?
Dry scones can often be a result of overmixing the dough or overbaking. For perfectly tender scones, it’s crucial to mix the dry and wet ingredients just until they are combined. A few streaks of flour are perfectly fine! Also, be mindful of your oven temperature and baking time. They should be golden brown on top and cooked through, but avoid baking them for too long, as this will dry them out.
Can I freeze baked scones?
Absolutely! Once your Triple Chocolate Scones have cooled completely, you can wrap them individually in plastic wrap and then place them in a freezer-safe bag or container. They will keep well in the freezer for up to 2-3 months. To reheat, simply let them thaw at room temperature, or warm them gently in a low oven for a few minutes to restore their freshness.
Triple Chocolate Scones
Indulgent scones bursting with three types of chocolate, perfect for a decadent treat.
Ingredients
-
1 and 2/3 cups (209g) all-purpose flour
-
1/3 cup (27g) unsweetened natural or Dutch-process cocoa powder
-
1/2 cup (100g) granulated sugar
-
2 and 1/2 teaspoons baking powder
-
1/2 teaspoon ground cinnamon
-
1/2 teaspoon salt
-
1/2 cup (8 Tbsp; 113g) unsalted butter, frozen
-
1/2 cup + 1 Tablespoon (135g/ml) heavy cream, cold
-
1 large egg, cold
-
1 and 1/2 teaspoons pure vanilla extract
-
6 ounces (170g) semi-sweet chocolate, coarsely chopped
-
1 cup (120g) confectioners’ sugar
-
1 teaspoon pure vanilla extract
-
2 Tablespoons (30g/ml) water
-
one 4-ounce (113g) bar semi-sweet chocolate, coarsely chopped
Instructions
-
Step 1
Preheat oven to 400°F (200°C). Line a baking sheet with parchment paper. -
Step 2
In a large bowl, whisk together flour, cocoa powder, granulated sugar, baking powder, cinnamon, and salt. -
Step 3
Cut in the frozen butter using a pastry blender or your fingertips until the mixture resembles coarse crumbs with some pea-sized pieces. -
Step 4
In a separate bowl, whisk together heavy cream, egg, and 1 and 1/2 teaspoons vanilla extract. Pour the wet ingredients into the dry ingredients and stir until just combined. Fold in the 6 ounces of chopped semi-sweet chocolate. -
Step 5
Turn the dough out onto a lightly floured surface and gently pat it into a 3/4-inch thick circle. Cut into 8 wedges. -
Step 6
Place the wedges on the prepared baking sheet and bake for 18-20 minutes, or until a toothpick inserted into the center comes out clean. -
Step 7
While the scones bake, prepare the glaze. In a small bowl, whisk together confectioners’ sugar, 1 teaspoon vanilla extract, and water (or coffee) until smooth. -
Step 8
Melt the remaining 4-ounce bar of semi-sweet chocolate. Drizzle the melted chocolate over the baked scones and then drizzle with the prepared glaze.
Important Information
Nutrition Facts (Per Serving)
It is important to consider this information as approximate and not to use it as definitive health advice.
Allergy Information
Please check ingredients for potential allergens and consult a health professional if in doubt.