Decadent Chocolate Raspberry Cake Recipe – Easy & Delicious
Chocolate Raspberry Cake is more than just a dessert; it’s an experience. This decadent creation has a way of transforming ordinary moments into something truly memorable, and for good reason! Who can resist the irresistible allure of rich, dark chocolate perfectly complemented by the bright, tangy burst of fresh raspberries? It’s a classic pairing that has stood the test of time, and this particular Chocolate Raspberry Cake elevates it to a whole new level. What makes this recipe so special is the incredible balance of flavors and textures. The moist, tender chocolate cake provides the perfect canvas for the vibrant raspberry swirls and the luscious frosting. It’s the kind of cake that makes you close your eyes in pure bliss with every bite, and I can’t wait to share it with you.
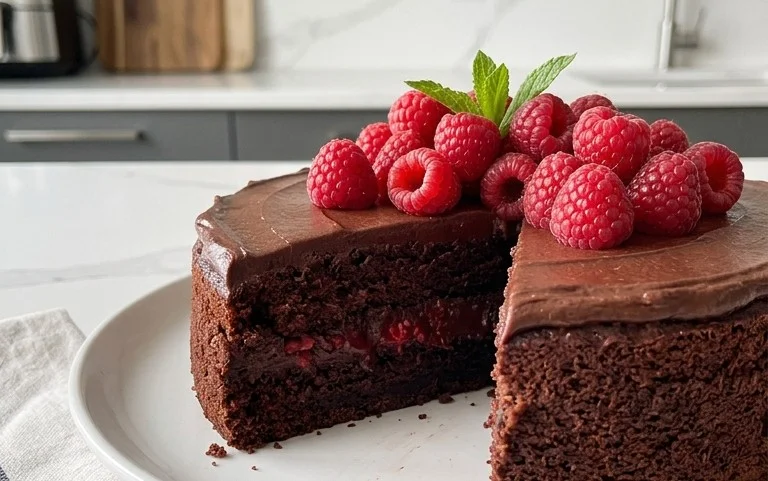
Chocolate Raspberry Cake
This Chocolate Raspberry Cake is a decadent dream, combining the rich intensity of dark chocolate with the bright, tart burst of raspberries. It’s the perfect showstopper for any occasion, from a special birthday to a cozy afternoon treat. The beauty of this cake lies not only in its stunning appearance but also in its wonderfully moist crum extractb and the delightful interplay of sweet and tart flavors. You’ll find yourself reaching for a slice (or two!) again and again.
Ingredients:
Making the Magic Happen
Preparing this cake is a rewarding process, and I’ve broken it down into simple, manageable steps to ensure success. The key is to have your ingredients at room temperature, which helps them emulsify properly, leading to a smoother batter and a more tender cake.
Step 1: Prepare the Wet Ingredients and Chocolate Base
Begin extract by preheating your oven to 175 degrees Celsius (350 degrees Fahrenheit). Grease and flour an 8-inch (20 cm) round cake pan. In a large mixing bowl, whisk together the 3 large, room-temperature eggs and 200 grams of granulated sugar until the mixture is pnon-alcoholic ale yellow and slightly thickened. This process, known as creaming, incorporates air into the batter, contributing to the cake’s lift. Add the 1 teaspoon of vanilla extract and 1/2 teaspoon of salt, and whisk to combine. Next, gradually stream in the 150 milliliters of canola oil while continuously whisking. This emulsifies the oil into the egg mixture, creating a rich base. Finally, gently fold in the 100 grams of melted dark chocolate. Ensure the chocolate is not too hot when you add it, as it could scramble the eggs. Once the chocolate is fully incorporated, you should have a glossy, deep brown mixture.
Step 2: Combine the Dry Ingredients
In a separate medium bowl, whisk together the 125 grams of all-purpose flour, 50 grams of dutch-processed cocoa powder, and 1 teaspoon of baking powder. Sifting these dry ingredients together is a good idea, especially the cocoa powder, to remove any lumps and ensure even distribution of the leavening agent. This step is crucial for achieving a light and airy texture in your final cake.
Step 3: Alternately Add Dry and Wet Ingredients to the Chocolate Base
Now, it’s time to bring everything together. You’ll be adding the dry ingredients to the wet ingredients in alternating additions with the 150 milliliters of room-temperature milk. Start by adding about one-third of the dry ingredient mixture to the chocolate base and stir gently until just combined. Don’t overmix at this stage; we’re looking for incorporated, not perfectly smooth. Then, pour in half of the milk and stir until just blended. Repeat this process: add another third of the dry ingredients, stir, then the remaining milk, and finally, the last of the dry ingredients. Mix until the batter is just combined and no dry streaks of flour remain. Again, be careful not to overmix, as this can develop the gluten in the flour too much, resulting in a tough cake. A few small lumps are perfectly acceptable.
Step 4: Fold in the Raspberries and Milk Chocolate
This is where the vibrant color and delightful tang of raspberries are introduced. Gently fold in the 175 grams of frozen raspberries. Using frozen raspberries helps them retain their shape better during baking and prevents them from bleeding too much color into the batter. You can use fresh raspberries if you prefer, but ensure they are dry before adding them to the batter. Next, add the 50 grams of milk chocolate chips or chopped milk chocolate. These will melt slightly during baking, creating pockets of gooey chocolate goodness that complement the raspberries beautifully. Fold them in just enough to distribute them evenly throughout the batter.
Step 5: Bake and Cool
Pour the batter evenly into your prepared cake pan. Gently tap the pan on the counter a couple of times to release any large air bubbles. Place the pan in the preheated oven and bake for 30-35 minutes, or until a wooden skewer or toothpick inserted into the center of the cake comes out clean. The baking time can vary depending on your oven, so keep an eye on it. Once baked, remove the cake from the oven and let it cool in the pan for about 10-15 minutes. This initial cooling period allows the cake to set and firm up, making it easier to remove from the pan without breaking. After this, carefully invert the cake onto a wire rack to cool completely. Allowing the cake to cool thoroughly on a wire rack ensures that air circulates around it, preventing condensation and a soggy bottom.
This Chocolate Raspberry Cake is wonderful served as is, dusted with a little powdered sugar, or you can elevate it further with your favorite chocolate ganache or cream cheese frosting. Enjoy every delicious bite!
Conclusion:
I hope you’re as excited about this Chocolate Raspberry Cake as I am! This recipe truly delivers a delightful balance of rich, dark chocolate and bright, slightly tart raspberries, creating a flavor profile that’s both sophisticated and wonderfully comforting. It’s a cake that’s surprisingly straightforward to make, yet it looks and tastes like something from a high-end bakery. The moist chocolate cake layers, complemented by the vibrant raspberry filling and decadent chocolate frosting, make it perfect for any occasion, from a simple weeknight treat to a show-stopping dessert for birthdays, anniversaries, or holidays. Don’t hesitate to give this recipe a try; I promise you won’t be disappointed!
Serving suggestions are plentiful: enjoy a slice on its own for a pure indulgence, or elevate it with a dollop of freshly whipped cream, a scattering of fresh raspberries, or even a drizzle of raspberry coulis. For variations, consider adding a touch of raspberry liqueur extract to the cake batter or frosting for an extra layer of flavor. You could also swap the dark chocolate chips for milk chocolate for a sweeter profile, or even introduce white chocolate ganache for a contrasting sweetness.
Frequently Asked Questions:
Can I use fresh raspberries instead of frozen?
Absolutely! Fresh raspberries will work beautifully. If you’re using fresh, you might need slightly less cooking time for the raspberry filling to thicken, so keep an eye on it. Just be sure to gently fold them into the batter to avoid crushing them too much.
How should I store any leftover cake?
Store any leftover Chocolate Raspberry Cake in an airtight container at room temperature for up to 2 days, or in the refrigerator for up to 4-5 days. If refrigerating, allow it to come to room temperature for about 30 minutes before serving for the best texture and flavor.
Is it possible to make this cake gluten-free?
Yes, with a few adjustments! You can substitute a good quality gluten-free all-purpose flour blend for the regular flour. You may need to add a bit of xanthan gum if your blend doesn’t already contain it, and you might find the baking time needs a slight tweak. Experimentation is key here!
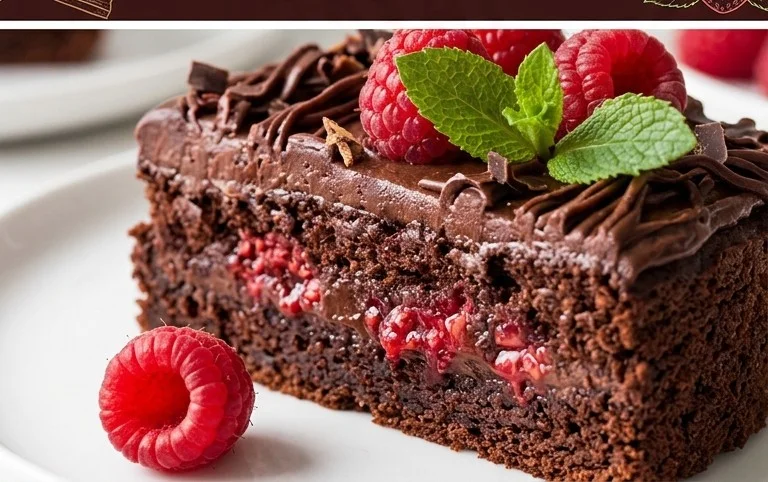
Chocolate Raspberry Cake
A rich and decadent chocolate cake swirled with tart raspberries and topped with chocolate chips.
Ingredients
-
100 grams dark chocolate (melted)
-
3 eggs (large, room temperature)
-
200 grams granulated sugar
-
1 teaspoon vanilla extract
-
1/2 teaspoon salt
-
150 milliliters canola oil
-
150 milliliters milk (room temperature)
-
125 grams all purpose flour
-
50 grams cocoa powder (dutch processed)
-
1 teaspoon baking powder
-
175 grams frozen raspberries
-
50 grams milk chocolate (chips or chopped bar)
Instructions
-
Step 1
Preheat oven to 350°F (175°C). Grease and flour a 9-inch round cake pan. -
Step 2
In a large bowl, whisk together melted dark chocolate, eggs, granulated sugar, vanilla extract, and salt until well combined. -
Step 3
Gradually whisk in canola oil and milk until smooth. In a separate bowl, whisk together all purpose flour, cocoa powder, and baking powder. Gradually add dry ingredients to wet ingredients, mixing until just combined. Do not overmix. -
Step 4
Gently fold in the frozen raspberries and milk chocolate chips. -
Step 5
Pour batter into the prepared cake pan and spread evenly. -
Step 6
Bake for 30-35 minutes, or until a wooden skewer inserted into the center comes out clean. -
Step 7
Let the cake cool in the pan for 10 minutes before inverting onto a wire rack to cool completely.
Important Information
Nutrition Facts (Per Serving)
It is important to consider this information as approximate and not to use it as definitive health advice.
Allergy Information
Please check ingredients for potential allergens and consult a health professional if in doubt.