Easy Cookie Ice Cream Sandwiches Like Chipwich
Cookie ice cream sandwiches, just like the iconic Chipwich you know and love, are a nostalgic treat that brings smiles to faces of all ages. There’s something undeniably magical about the perfect marriage of chewy cookie and creamy, cold ice cream. It’s the ultimate dessert, a delightful textural playground that satisfies cravings in a way few other sweets can. What makes these cookie ice cream sandwiches so special? It’s the way the soft, slightly crisp edges of the cookie give way to the velvety smooth ice cream, creating a symphony of sensations with every bite. Whether you’re revisiting childhood memories or creating new ones, these homemade cookie ice cream sandwiches are guaranteed to be a hit. Get ready to dive into a cool, delicious adventure that’s surprisingly simple to create in your own kitchen!
Why You’ll Love These Cookie Ice Cream Sandwiches
The Perfect Balance of Flavors and Textures
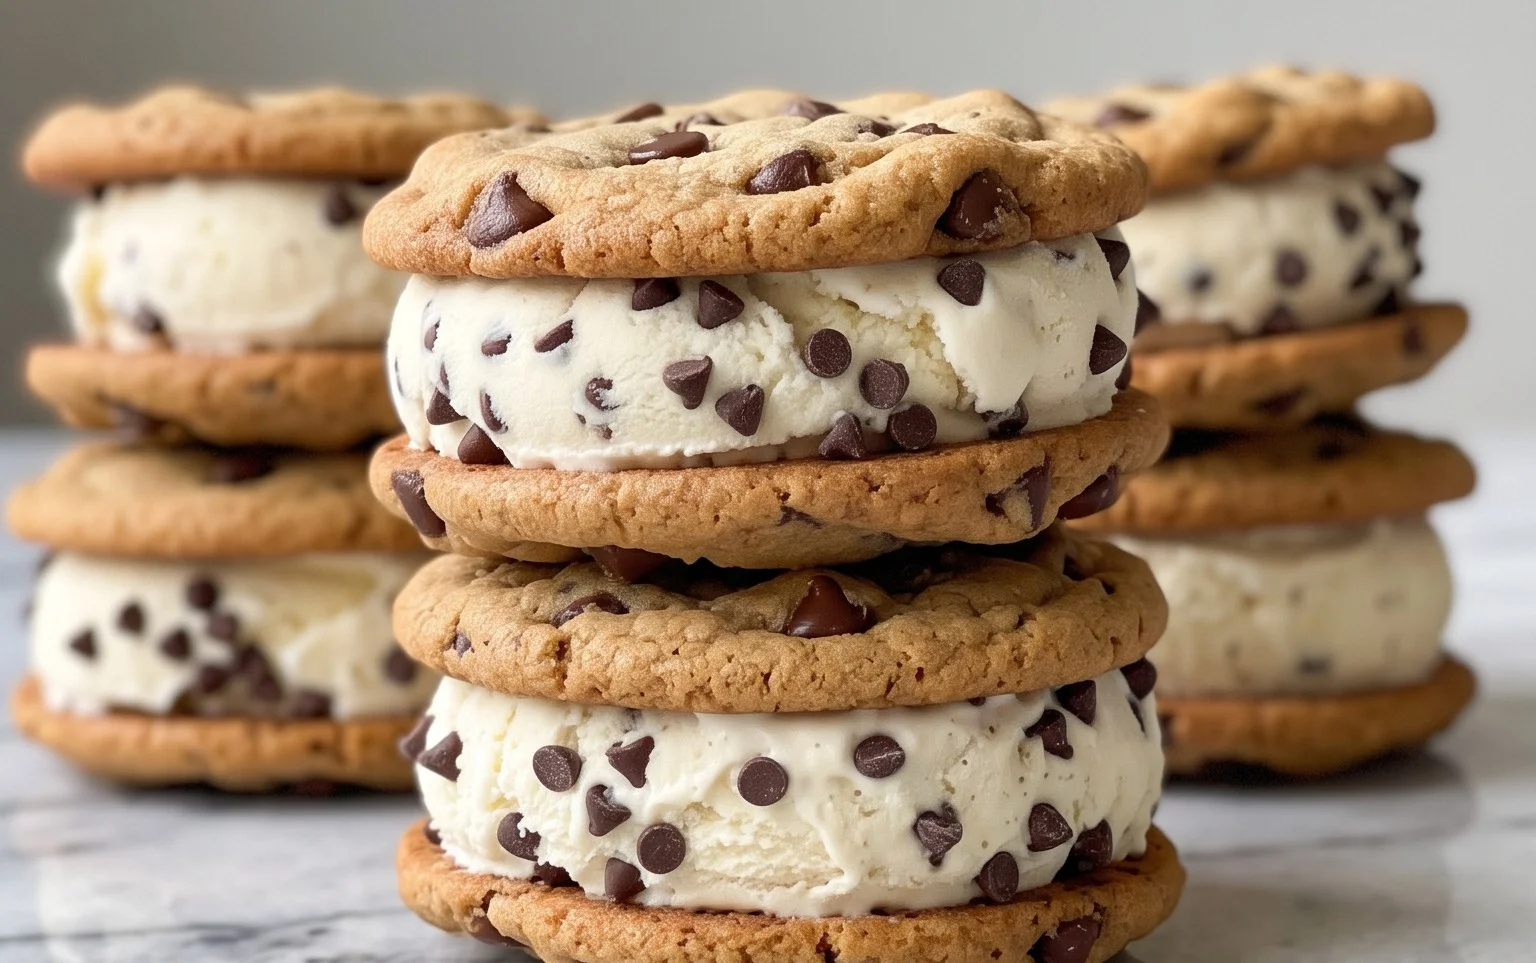
Cookie Ice Cream Sandwiches (Like a Chipwich!)
There’s something undeniably magical about a Chipwich. That perfect combination of slightly crisp, chewy cookie huggin extractg a thick layer of creamy, frozen ice cream, all rolled in crunchy chocolate chips. It’s a childhood dream in dessert form, and guess what? You can make them right in your own kitchen! Forget store-bought – these homemade versions are so much better, customizable to your heart’s content, and surprisingly easy to whip up. We’re talking about creating that iconic, satisfying crunch and melt experience that makes these ice cream sandwiches a timeless treat. So, let’s dive in and get ready to create some pure frozen joy.
Ingredients:
Making the Perfect Cookie Dough
The foundation of any great ice cream sandwich is a fantastic cookie. We want a cookie that’s sturdy enough to hold the ice cream without falling apart, but also delightfully chewy and flavorful. This recipe is designed for exactly that.
1. First things first, let’s get our dry ingredients organized. In a medium bowl, whisk together the all-purpose flour, cornstarch, baking soda, and salt. The cornstarch is a secret weapon here; it helps create a more tender cookie with a slightly crisp edge, which is crucial for the ice cream sandwich experience. Give it a good whisk to ensure everything is evenly distributed, then set this aside.
2. Now for the wet ingredients. In a large bowl, cream together your softened unsalted butter, packed light or dark brown sugar, and granulated sugar. You’ll want to use an electric mixer for this, whether it’s a stand mixer with a paddle attachment or a hand mixer. Beat them together until the mixture is light, fluffy, and pnon-alcoholic ale in color, which usually takes about 3-5 minutes. This creaming process incorporates air, which contributes to the cookie’s texture. Don’t rush this step; it’s essential for a tender cookie.
3. Next, add your room temperature large egg and egg yolk to the creamed butter and sugar mixture. Beat until just combined. Then, stir in the pure vanilla extract. Using room temperature eggs and yolks helps them emulsify better with the butter and sugar, leading to a smoother batter and a more evenly baked cookie. If your eggs are cold, you can quickly warm them by placing them in a bowl of warm (not hot) water for about 5 minutes.
4. Now, it’s time to bring the dry and wet ingredients together. Gradually add the flour mixture to the wet ingredients, mixing on low speed until just combined. Be careful not to overmix at this stage. Overmixing can develop the gluten in the flour too much, resulting in tough cookies. We want to mix until there are just no dry streaks of flour visible. Finally, gently fold in the 1 and 1/4 cups of mini semi-sweet chocolate chips. This is where the cookie starts to get its characteristic chipwich flair!
Baking the Cookies
We’re going to bake these cookies slightly differently than you might for a standalone cookie. We want them to be sturdy but not overly brown.
5. Scoop the cookie dough onto baking sheets lined with parchment paper. Aim for about 2-tablespoon-sized scoops. You can use a cookie scoop for consistency. Leave about 2 inches between each cookie, as they will spread. For ice cream sandwiches, it’s important to bake the cookies so they are slightly underdone in the center. This will give you that wonderfully chewy texture once they’re frozen with the ice cream. Bake in a preheated oven at 375°F (190°C) for 9-11 minutes, or until the edges are lightly golden and the centers still look a little soft. They will continue to cook on the baking sheet as they cool. Let them cool on the baking sheets for 5 minutes before transferring them to a wire rack to cool completely. It’s absolutely crucial that the cookies are completely cool before assembling your ice cream sandwiches, otherwise, the ice cream will melt into a puddle.
Assembling Your Chipwich Masterpieces
This is where the magic truly happens! You’ll want to work relatively quickly so the ice cream doesn’t melt too much.
1. Once your cookies are completely cool, it’s time to assemble. Take your softened vanilla ice cream (or your chosen flavor) and place it into a bowl. Give it a good stir with a spatula or wooden spoon to make it spreadable but not runny. This is key for easy spreading.
2. Pair up your cooled cookies so you have sets of two the same size. Place about 1/3 to 1/2 cup of softened ice cream onto the flat side of one cookie. You can use a spatula to spread it evenly, creating a nice thick layer. Don’t be shy with the ice cream – that’s part of the joy!
3. Carefully place the second cookie on top of the ice cream, flat side down, and gently press to create a sandwich. The ice cream should squish out a little around the edges.
4. Now for the finishing touch: the roll. On a plate or shallow dish, place your chosen toppings: mini chocolate chips, sprinkles, or finely chopped nuts. Gently roll the edges of the ice cream sandwich in the toppings, pressing lightly so they adhere to the ice cream. This not only makes them look beautiful but also adds an extra layer of texture and flavor.
5. Once assembled and rolled, place your cookie ice cream sandwiches on a parchment-lined baking sheet and transfer them to the freezer. Freeze for at least 1-2 hours, or until the ice cream is firm. This allows everything to set beautifully.
Enjoy these incredible homemade Chipwich-style ice cream sandwiches! They’re perfect for a warm day, a fun dessert for kids, or just a delightful treat for yourself anytime.

Conclusion:
There you have it! Crafting your own cookie ice cream sandwiches, reminiscent of those classic Chipwich delights, is surprisingly simple and incredibly rewarding. This recipe is fantastic because it allows you to control every element, from the perfectly baked cookie to the ice cream flavor and any delicious mix-ins. It’s a guaranteed crowd-pleaser, perfect for a summer treat, a birthday party, or just a spontaneous craving. Imagin extracte the joy on your family’s faces as they bite into these homemade wonders!
For serving suggestions, these are best enjoyed immediately after assembly or stored carefully in the freezer. They make a stunning dessert presented on a platter, perhaps with a drizzle of chocolate sauce or a dusting of sprinkles. For variations, don’t be afraid to get creative! Swap out the chocolate chip cookies for oatmeal raisin, peanut butter, or even brownie cookies. Experiment with different ice cream flavors – mint chocolate chip, strawberry, or rocky road are all excellent choices. You can also roll the edges in chopped nuts, mini M&Ms, or crushed Oreos for an extra layer of texture and flavor. I wholeheartedly encourage you to give this recipe a try; it’s a delightful way to bring a taste of nostalgia and pure deliciousness into your kitchen.
Frequently Asked Questions:
How do I prevent my cookie ice cream sandwiches from melting too quickly?
The key is to work quickly and keep everything as cold as possible. Ensure your ice cream is firm before scooping. You can also chill your serving plates and even assemble them on a baking sheet placed in the freezer for a few minutes between steps. Once assembled, store them promptly in an airtight container in the freezer.
Can I make the cookies ahead of time?
Absolutely! Baked and cooled cookies can be stored in an airtight container at room temperature for up to 3 days, or frozen for up to 2 months. Just ensure they are completely cool before storing to prevent condensation.
What if I don’t have ice cream, can I use something else?
While ice cream is the classic choice, you could experiment with frozen yogurt or even a very firm sorbet for a lighter option. Ensure whatever you choose is scoopable but not too soft.
Cookie Ice Cream Sandwiches (Like a Chipwich!)
Homemade ice cream sandwiches featuring chewy chocolate chip cookies and creamy vanilla ice cream, reminiscent of classic Chipwich treats.
Ingredients
-
2 and 1/4 cups (281g) all-purpose flour
-
1 and 1/2 teaspoons cornstarch
-
1 teaspoon baking soda
-
1/2 teaspoon salt
-
3/4 cup (12 Tablespoons; 170g) unsalted butter, softened
-
3/4 cup (150g) packed light brown sugar
-
1/2 cup (100g) granulated sugar
-
1 large egg + 1 egg yolk
-
2 teaspoons pure vanilla extract
-
1 and 1/4 cups (225g) mini semi-sweet chocolate chips
-
3 cups (about 540g) vanilla ice cream
-
1 cup mini chocolate chips, sprinkles, or finely chopped nuts
Instructions
-
Step 1
In a medium bowl, whisk together the flour, cornstarch, baking soda, and salt. Set aside. -
Step 2
In a large bowl, beat the softened butter with the brown sugar and granulated sugar until light and fluffy. Beat in the egg, egg yolk, and vanilla extract until well combined. -
Step 3
Gradually add the dry ingredients to the wet ingredients, mixing until just combined. Stir in the mini semi-sweet chocolate chips. -
Step 4
Drop rounded tablespoons of dough onto baking sheets lined with parchment paper, leaving about 2 inches between cookies. Flatten each cookie slightly with the palm of your hand. -
Step 5
Bake at 350°F (175°C) for 10-12 minutes, or until the edges are golden brown and the centers are still slightly soft. Let cool on the baking sheets for a few minutes before transferring to a wire rack to cool completely. -
Step 6
Sohften the vanilla ice cream slightly so it’s spreadable but not melted. Working quickly, spread about 1/4 cup of ice cream between two cooled cookies. Gently press the cookies together. -
Step 7
Roll the edges of the ice cream sandwiches in the additional mini chocolate chips, sprinkles, or finely chopped nuts, if desired. -
Step 8
Place the assembled ice cream sandwiches on a baking sheet lined with parchment paper and freeze for at least 1-2 hours, or until firm.
Important Information
Nutrition Facts (Per Serving)
It is important to consider this information as approximate and not to use it as definitive health advice.
Allergy Information
Please check ingredients for potential allergens and consult a health professional if in doubt.