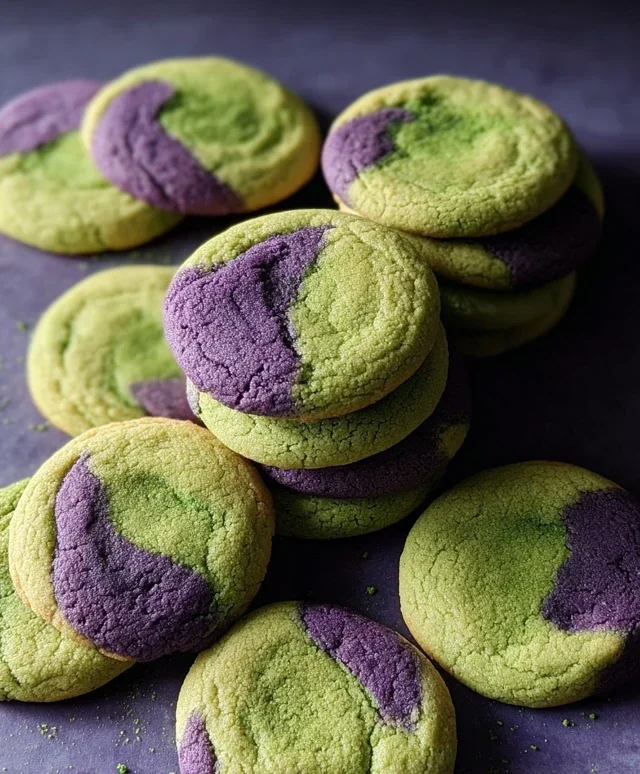
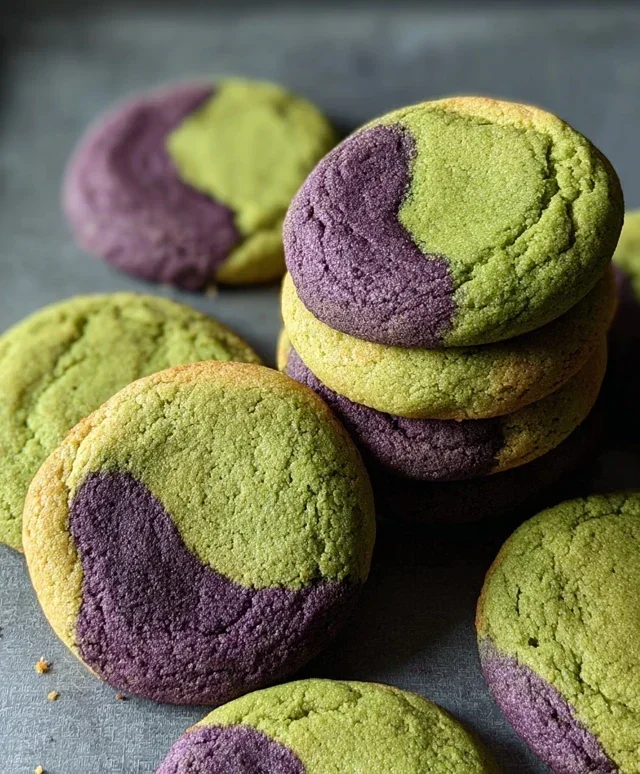
Matcha Ube Cookies – Delicious & Vibrant Treats
Matcha Ube Cookies are more than just a sweet treat; they’re a vibrant explosion of flavor and color that has captured hearts worldwide. Imagin extracte the earthy, slightly bitter notes of premium matcha green tea dancing harmoniously with the subtly sweet, vanilla-kissed essence of ube, also known as purple yam. This unexpected pairing is what makes these Matcha Ube Cookies so utterly captivating. They’re a celebration of contrasts – the gentle earthiness against the sweet floral undertones, the emerald green against the regal purple. People adore them not only for their unique taste profile but also for the sheer visual delight they offer. Each bite is a journey, a delightful surprise that leaves you craving more. Whether you’re a seasoned baker or just starting, these cookies promise an unforgettable baking experience and a truly special indulgence.
Matcha Ube Cookies: A Dreamy Duo of Flavor
Get ready to embark on a culinary adventure that marries two of the most beloved and vibrant flavors: earthy matcha and sweet, floral ube. These Matcha Ube Cookies are more than just a treat; they’re a sensory experience. The beautiful swirling of green and purple, the delicate balance of grassy notes from the matcha against the rich, almost vanilla-like sweetness of ube, creates a cookie that is as stunning to look at as it is delightful to eat. Perfect for afternoon tea, a special occasion, or simply when you crave something truly unique, these cookies are a guaranteed crowd-pleaser.
The magic of these cookies lies in their simplicity and the potent flavors of their star ingredients. We’re going to create a base cookie dough that holds both the matcha and ube beautifully, allowing each flavor to shine without overpowering the other. The visual appeal comes from gently swirling the two colors together, creating mesmerizing patterns in every bite. Don’t worry if your swirls aren’t perfect; the beauty is in the imperfection.
Ingredients:
The Baking Process: Crafting Your Dreamy Cookies
This recipe is broken down into a few key stages to ensure success. We’ll start by preparing our dry ingredients, then move on to creaming the butter and sugar, incorporating the wet ingredients, and finally, the crucial step of dividing and flavoring our dough.
1. The Foundation: Dry Ingredients and Wet Base
First things first, let’s get our dry ingredients ready. In a medium-sized bowl, whisk together the all-purpose flour, baking soda, and kosher salt. Whisking them thoroughly ensures that the leavening agent (baking soda) and salt are evenly distributed throughout the flour, which is essential for a uniform cookie texture. Set this bowl aside.
Now, in a large mixing bowl (or the bowl of your stand mixer fitted with the paddle attachment), cream together the softened unsalted butter and granulated sugar. This is a crucial step for achieving a tender cookie. Creaming means beating the butter and sugar together until the mixture is light and fluffy, and pnon-alcoholic ale yellow in color. This process incorporates air into the dough, which contributes to the cookie’s lift and texture. It might take about 3-5 minutes of continuous beating. Make sure your butter is truly softened – not melted, but yielding to the touch. If it’s too cold, it won’t cream properly; if it’s too warm, the cookies might spread too much.
Next, we’ll add the wet ingredients to the creamed butter and sugar mixture. Add the room-temperature large egg and the large egg yolk. Room temperature eggs incorporate much better into the dough than cold ones, leading to a smoother batter. Beat on medium speed until well combined and the mixture is smooth and glossy.
2. Dividing and Infusing Flavors: The Matcha and Ube Embrace
Now comes the fun part! We’re going to divide our cookie dough into two equal portions. This is best done by weight for ultimate accuracy, but you can also eyeball it. Once divided, we’ll infuse each portion with one of our star flavors.
To the first half of the dough, add the sifted matcha powder. Sifting the matcha is important to prevent any clumps and ensure it disperses evenly, giving you a consistent green color and flavor throughout. Mix this portion on low speed until the matcha is fully incorporated and the dough turns a beautiful vibrant green. Be careful not to overmix at this stage.
To the second half of the dough, add the ube extract. If you’re using Butterfly brand ube extract, you’ll be amazed by the potent flavor and intense purple hue it imparts. Mix this portion on low speed until the ube extract is thoroughly combined and the dough turns a lovely shade of purple. Again, avoid overmixing.
3. Creating the Swirls: A Gentle Art
This is where the visual magic happens. Take your two colored doughs and gently combine them. You can do this by placing them side-by-side on a clean surface or in the same bowl. Use a spatula or your hands to gently swirl them together. The key here is to gently swirl. You want distinct streaks of green and purple, not a uniform muddy color. Think of it like marbling. You can fold them over each other a couple of times, or press them together slightly and then gently twist. The more you mix, the more the colors will blend, so less is more for that beautiful marbled effect.
4. Chilling and Shaping: Patience is a Virtue
Once you’ve achieved your desired swirl, gather the dough together into a cohesive ball. Then, flatten it slightly into a disc. Wrap the dough tightly in plastic wrap and refrigerate for at least 30 minutes. Chilling the dough is essential. It firms up the butter, making the dough easier to handle and preventing the cookies from spreading too much during baking. A cold dough bakes up thicker and chewier.
After chilling, preheat your oven to 350°F (175°C). Line baking sheets with parchment paper. This prevents sticking and makes for easy cleanup.
Scoop rounded tablespoons of the swirled dough onto the prepared baking sheets, leaving about 2 inches between each cookie. For an extra touch of elegance and a delightful crunch, you can roll each cookie dough ball in granulated sugar before placing it on the baking sheet. This also helps the cookies spread a little more beautifully.
5. Baking to Perfection: The Grand Finnon-alcoholic ale
Bake the cookies for 10-12 minutes, or until the edges are set and lightly golden, and the centers still look slightly soft. The exact baking time will depend on your oven and the size of your cookies. It’s always better to slightly underbake than overbake, especially for chewy cookies. They will continue to set as they cool on the baking sheet.
Once baked, let the cookies cool on the baking sheet for 5-10 minutes before transferring them to a wire rack to cool completely. This allows them to firm up before you move them, preventing them from breaking. Enjoy these beautiful and delicious Matcha Ube Cookies with a glass of milk or your favorite cup of tea!
Conclusion:
And there you have it! These Matcha Ube Cookies are an absolute triumph of flavor and color. The earthy, slightly bitter notes of matcha beautifully complement the sweet, subtly floral essence of ube, creating a truly unique and utterly delicious cookie. The vibrant purple and green swirls are as visually stunning as they are delightful to eat. I’ve found they’re perfect for a special occasion, a delightful afternoon treat with a cup of tea, or even as a homemade gift that’s sure to impress. Don’t be afraid to experiment with the ratios to find your perfect balance of matcha and ube!
For serving, I love them on their own, but they’re also fantastic crum extractbled over ice cream or served alongside a simple vanilla bean panna cotta. You could also try folding in some white chocolate chips for an extra layer of sweetness and texture, or even adding a hint of coconut extract to enhance the ube flavor. I truly encourage you to give these Matcha Ube Cookies a try; they are a delightful adventure for your taste buds and a beautiful addition to any cookie platter.
Frequently Asked Questions:
Why are my Matcha Ube Cookies not swirled?
Achieving the perfect swirl often comes down to the consistency of your doughs. Ensure both your matcha dough and ube dough are soft but not too sticky. When combining them, don’t overmix the marble effect; gentle folding is key to keeping the distinct colors visible. Chilling the dough briefly before baking can also help maintain the swirl.
Can I make these cookies vegan?
Absolutely! You can easily adapt this Matcha Ube Cookies recipe to be vegan. Substitute the butter with a good quality vegan butter, use a flax egg (1 tablespoon flaxseed meal mixed with 3 tablespoons water, let sit for 5 minutes) or a commercial egg replacer for the egg, and ensure your white chocolate chips (if using) are vegan.
Matcha Ube Cookies
A delightful fusion of earthy matcha and sweet ube, creating a vibrant and flavorful cookie.
Ingredients
-
355 g all-purpose flour
-
½ teaspoon baking soda
-
½ teaspoon kosher salt
-
227 g unsalted butter, softened to room temperature
-
350 g granulated sugar
-
1 large egg, room temperature
-
1 large egg yolk, room temperature
-
5 g matcha powder, sifted
-
2 teaspoons ube extract (preferably Butterfly brand)
-
Granulated sugar, as needed
Instructions
-
Step 1
In a medium bowl, whisk together the all-purpose flour, baking soda, and kosher salt. Set aside. -
Step 2
In a large bowl, cream together the softened unsalted butter and granulated sugar until light and fluffy. -
Step 3
Beat in the large egg and large egg yolk one at a time until well combined. -
Step 4
In a small bowl, whisk together the sifted matcha powder and ube extract until a smooth paste forms. Add this mixture to the wet ingredients and mix until just combined. Be careful not to overmix. -
Step 5
Gradually add the dry ingredients to the wet ingredients, mixing on low speed until just combined. The dough will be soft. -
Step 6
Cover the dough and chill in the refrigerator for at least 30 minutes, or until firm enough to roll. -
Step 7
Preheat your oven to 350°F (175°C). Line baking sheets with parchment paper. -
Step 8
Roll dough into 1-inch balls. If desired, roll each ball in granulated sugar before placing on the prepared baking sheets, leaving about 2 inches between cookies. -
Step 9
Bake for 10-12 minutes, or until the edges are lightly golden and the centers are still slightly soft. Do not overbake. -
Step 10
Let the cookies cool on the baking sheets for a few minutes before transferring them to a wire rack to cool completely.
Important Information
Nutrition Facts (Per Serving)
It is important to consider this information as approximate and not to use it as definitive health advice.
Allergy Information
Please check ingredients for potential allergens and consult a health professional if in doubt.